uni-app android
环境版本
macOS Monterey12.2 Intel
HBuilderX 4.23
Android Studio Koala | 2024.1.1 Patch 1
官网地址: https://uniapp.dcloud.net.cn/
官网参考: https://nativesupport.dcloud.net.cn/AppDocs/usesdk/android.html
1. HBuilderX 创建项目
1.1 下载安装 HBuilderX
- 软件下载安装
官网地址: https://www.dcloud.io/hbuilderx.html
历史版本: https://hx.dcloud.net.cn/Tutorial/HistoryVersion
下载4.2.3版本
- 安装
scss/sass编译插件
插件市场地址: https://ext.dcloud.net.cn/plugin?id=2046
1.2. vue3项目(不推荐)
注意
部分IOT国内芯片只支持android5.0,不支持vue3
可能报错WebView version is too low
- 创建项目
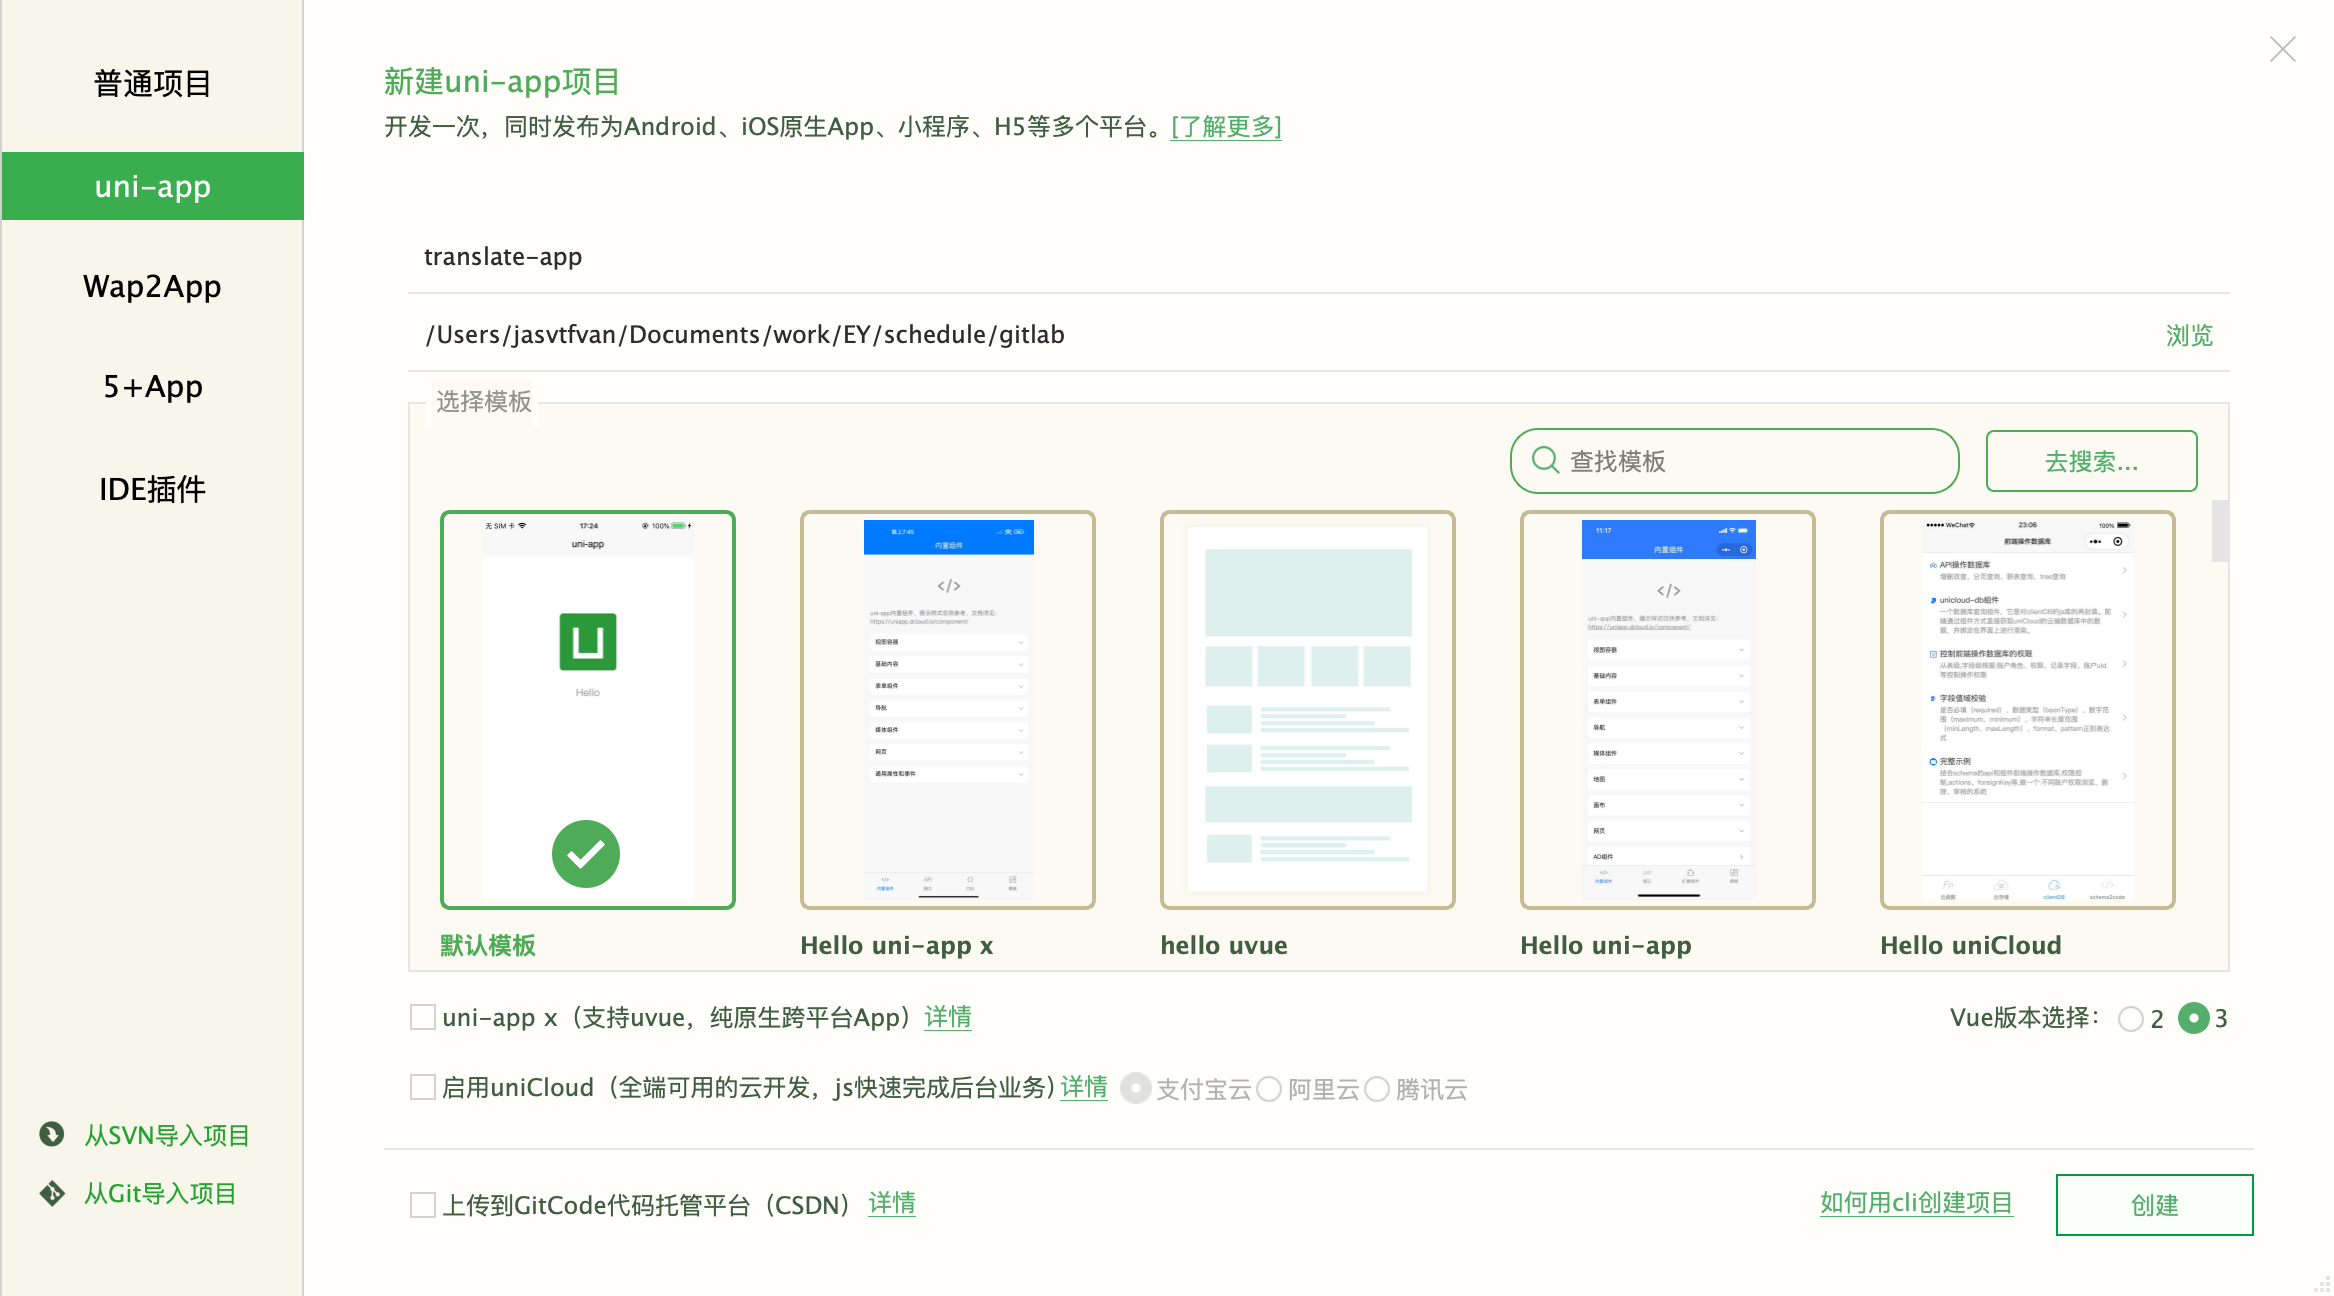
绑定开发者账户后,自动生成Appid,并在开发者中心可以查看
- 安装
uview-plusUI库
官网地址: https://uview-plus.jiangruyi.com/components/install.html
参考地址: https://uview-plus.jiangruyi.com/components/npmSetting.html
这里使用
npm方式安装安装依赖
npm install dayjs
npm install uview-plus
npm install clipboard- 修改
main.js
import uviewPlus from 'uview-plus'
...
// #ifdef VUE3
import { createSSRApp } from 'vue'
export function createApp() {
  const app = createSSRApp(App)
  app.use(uviewPlus)
  return {
    app
  }
}
// #endif- 修改
uni.scss
...
@import 'uview-plus/theme.scss';- 修改
App.vue
<style lang="scss">
	/* 注意要写在第一行,同时给style标签加入lang="scss"属性 */
	@import "uview-plus/index.scss";
	/*每个页面公共css */
</style>- 修改
pages.json
温馨提示
uni-app为了调试性能的原因,修改easycom规则不会实时生效,配置完后,您需要重启HX或者重新编译项目才能正常使用uview-plus的功能。
请确保您的pages.json中只有一个easycom字段,否则请自行合并多个引入规则。
{
	"easycom": {
		"autoscan": true,
		// 注意一定要放在custom里,否则无效,https://ask.dcloud.net.cn/question/131175
		"custom": {
			"^u--(.*)": "uview-plus/components/u-$1/u-$1.vue",
			"^up-(.*)": "uview-plus/components/u-$1/u-$1.vue",
			"^u-([^-].*)": "uview-plus/components/u-$1/u-$1.vue"
		}
	},
	"pages": [
        ...
    ],
    ...
}- 页面
demo
<template>
<view style="padding: 20px;">
<up-button type="primary" text="确定"></up-button>
<up-button type="primary" :plain="true" text="镂空"></up-button>
<up-button type="primary" :plain="true" :hairline="true" text="细边"></up-button>
<up-button type="primary" :disabled="true" text="禁用"></up-button>
<up-button type="primary" loading loadingText="加载中"></up-button>
<up-button type="primary" icon="map" text="图标按钮"></up-button>
<up-button type="primary" shape="circle" text="按钮形状"></up-button>
<up-button text="渐变色按钮" color="linear-gradient(to right, rgb(66, 83, 216), rgb(213, 51, 186))"></up-button>
<up-button type="primary" size="small" text="大小尺寸"></up-button>
</view>
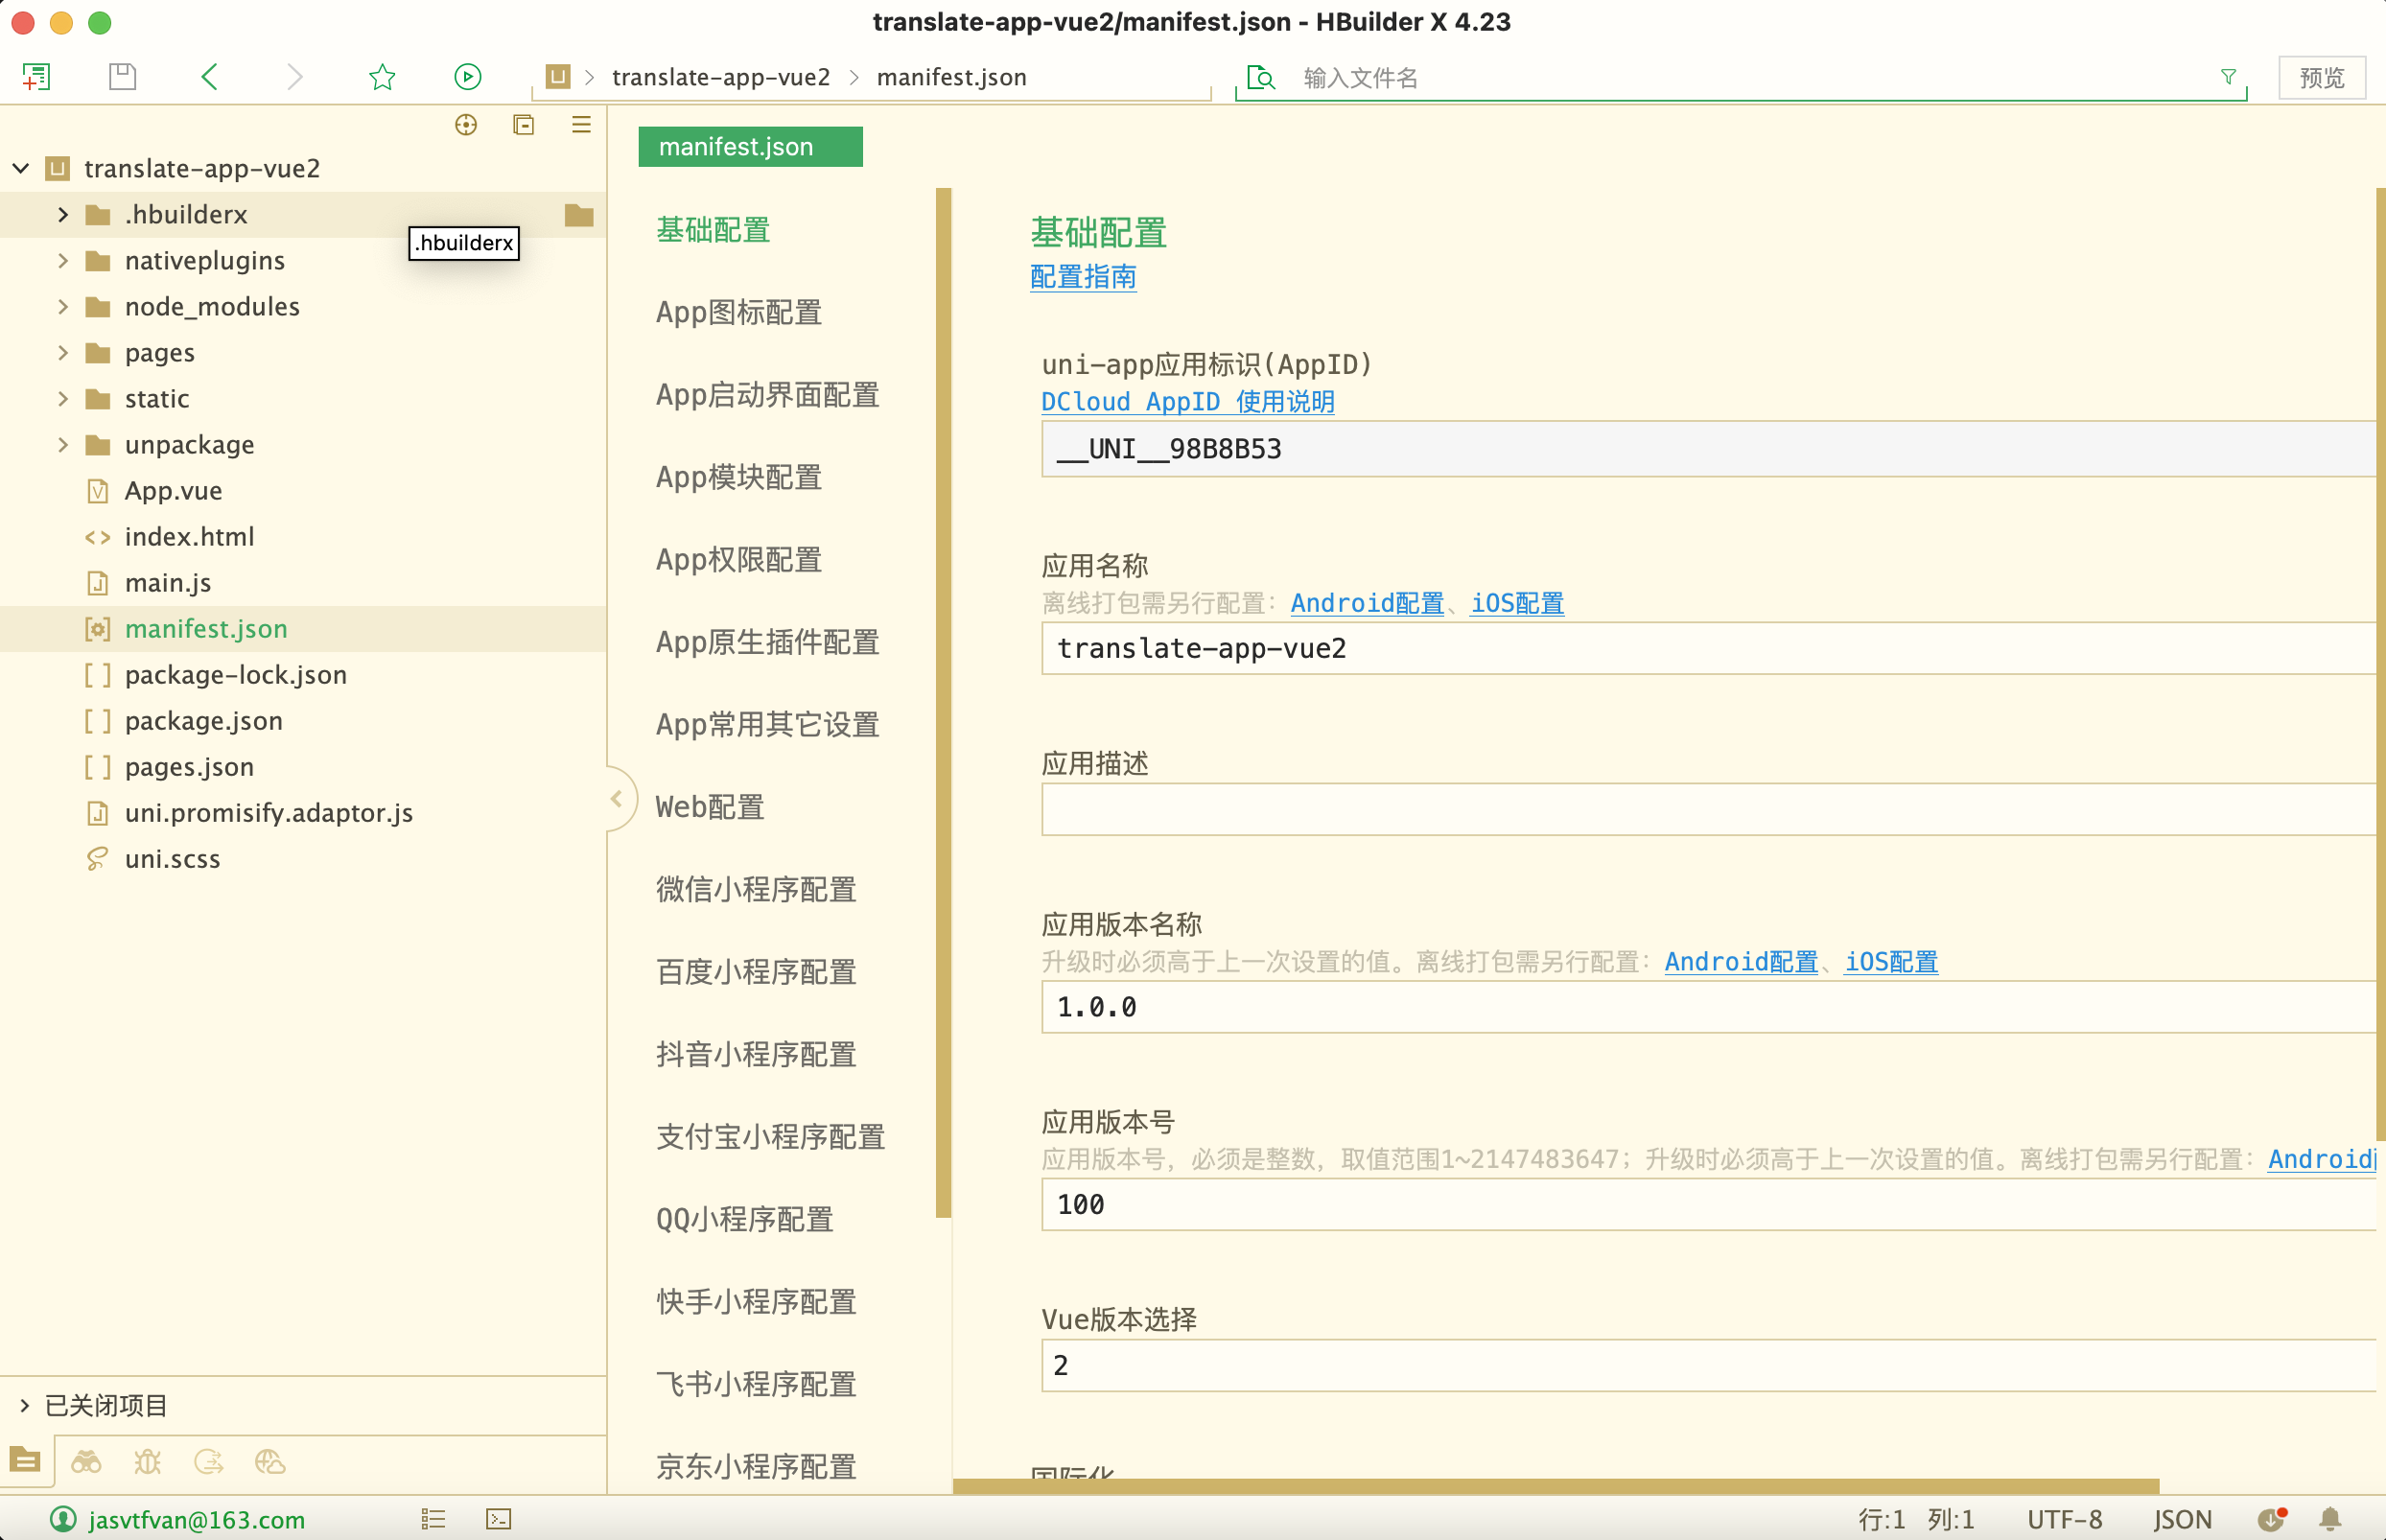
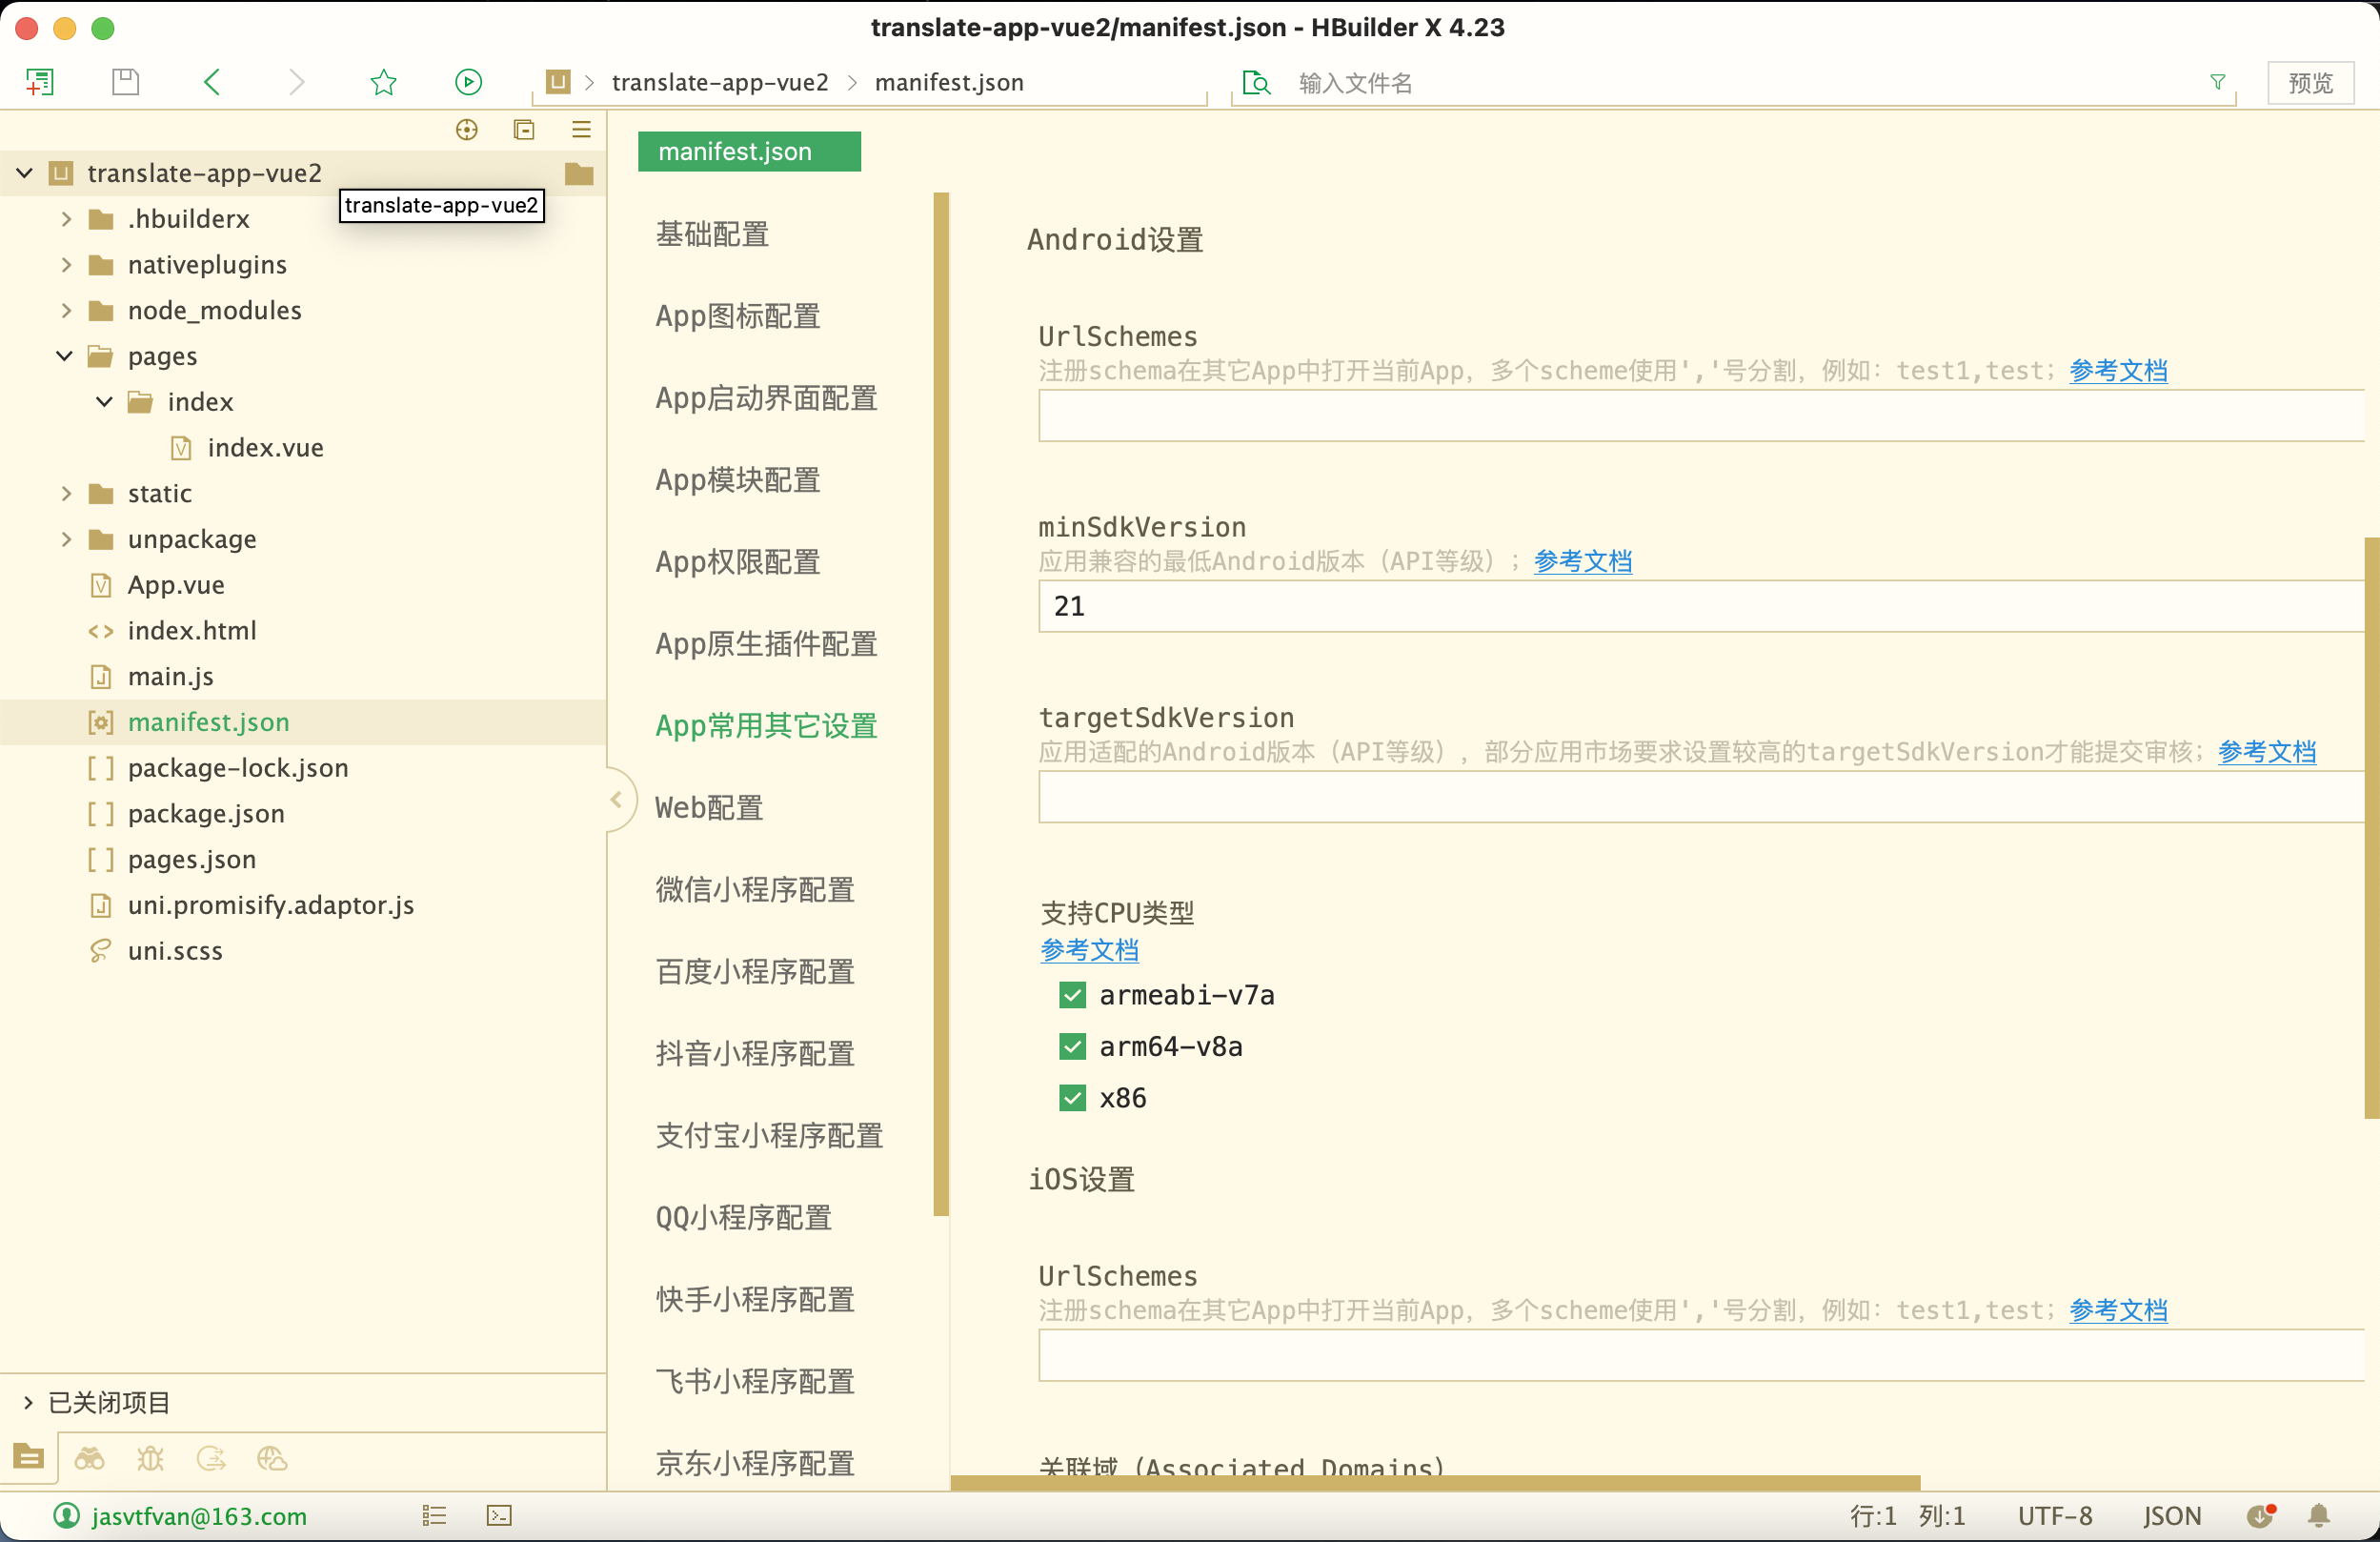
</template>- 修改
manifest.json
1.3. vue2项目(推荐)
注意
部分IOT国内芯片只支持android5.0,需要使用vue2创建项目
- 创建项目
效果图参考vue3``Vue版本选择2,Appid在开发者中心可以查看
- 安装
uviewUI库
官网地址: https://uviewui.com/
参考地址: https://uviewui.com/components/npmSetting.html
这里使用
npm方式安装安装依赖
npm i uview-ui- 修改
main.js
import App from './App';
import uView from "uview-ui";
...
Vue.use(uView);

const app = new Vue({
  ...App
})
app.$mount()
...- 修改
uni.scss
...
@import 'uview-ui/theme.scss';- 修改
App.vue
<style lang="scss">
	/* 注意要写在第一行,同时给style标签加入lang="scss"属性 */
	@import "uview-ui/index.scss";
	/*每个页面公共css */
</style>- 修改
pages.json
温馨提示
uni-app为了调试性能的原因,修改easycom规则不会实时生效,配置完后,您需要重启HX或者重新编译项目才能正常使用uview-plus的功能。
请确保您的pages.json中只有一个easycom字段,否则请自行合并多个引入规则。
{
	"easycom": {
		"^u-(.*)": "uview-ui/components/u-$1/u-$1.vue"
	},
	"pages": [
        ...
    ],
    ...
}- 页面
demo
<template>
    <view style="padding: 20px;">
        <u-button type="primary" text="确定"></u-button>
        <u-button type="primary" :plain="true" text="镂空"></u-button>
        <u-button type="primary" :plain="true" :hairline="true" text="细边"></u-button>
        <u-button type="primary" loading loadingText="加载中"></u-button>
        <u-button type="primary" icon="map" text="图标按钮"></u-button>
        <u-button type="primary" shape="circle" text="按钮形状"></u-button>
        <u-button text="渐变色按钮" color="linear-gradient(to right, rgb(66, 83, 216), rgb(213, 51, 186))"></u-button>
        <u-button type="primary" size="small" text="大小尺寸"></u-button>
    </view>
</template>- 修改
manifest.json
2. 开发者中心
官网地址: https://dev.dcloud.net.cn
2.1. 管理应用
分别点击: 应用管理 -> 我的应用 -> 应用名称

2.2. 创建云端证书
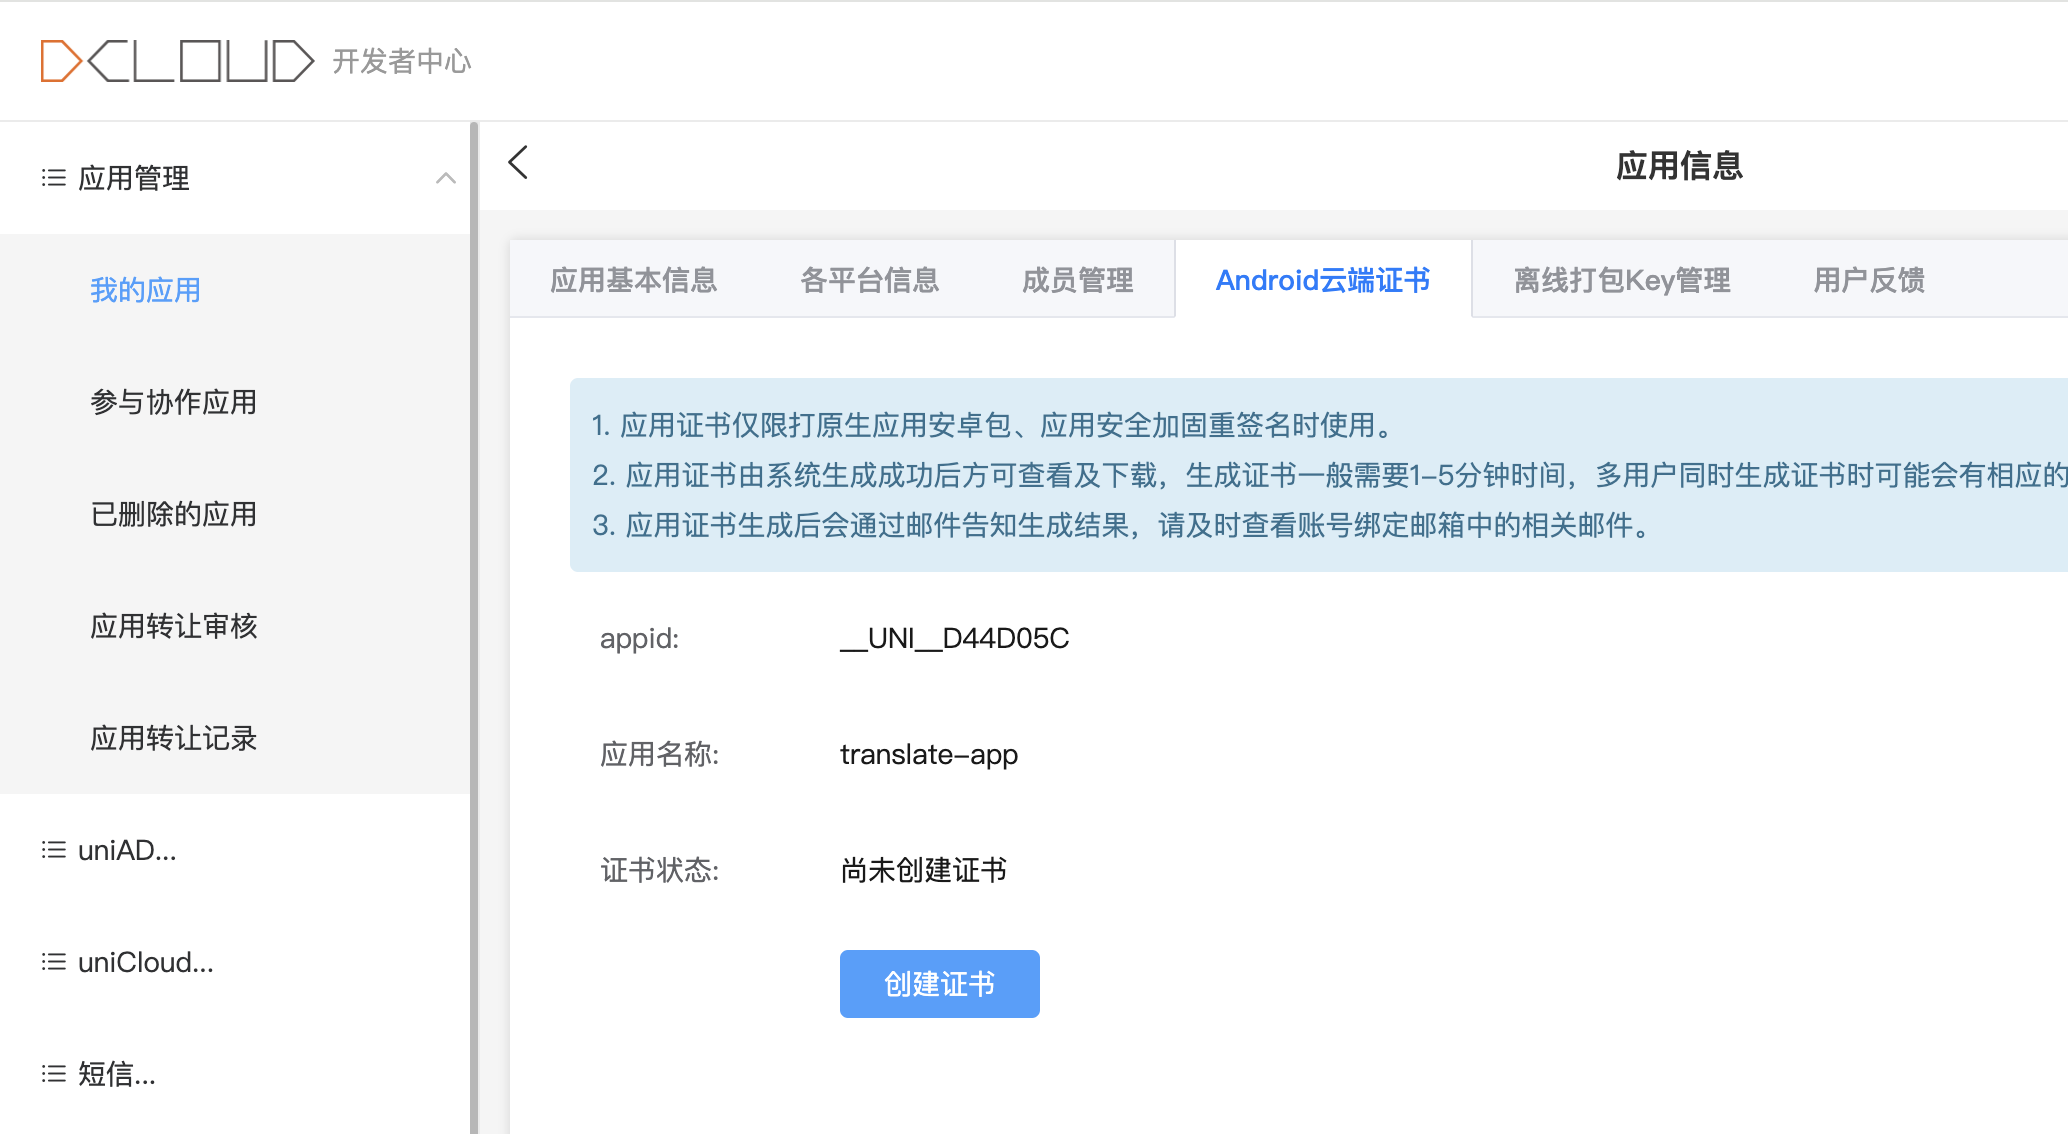
点击创建证书,创建完成后,点击证书详情 -> 查看证书密码 -> 下载证书
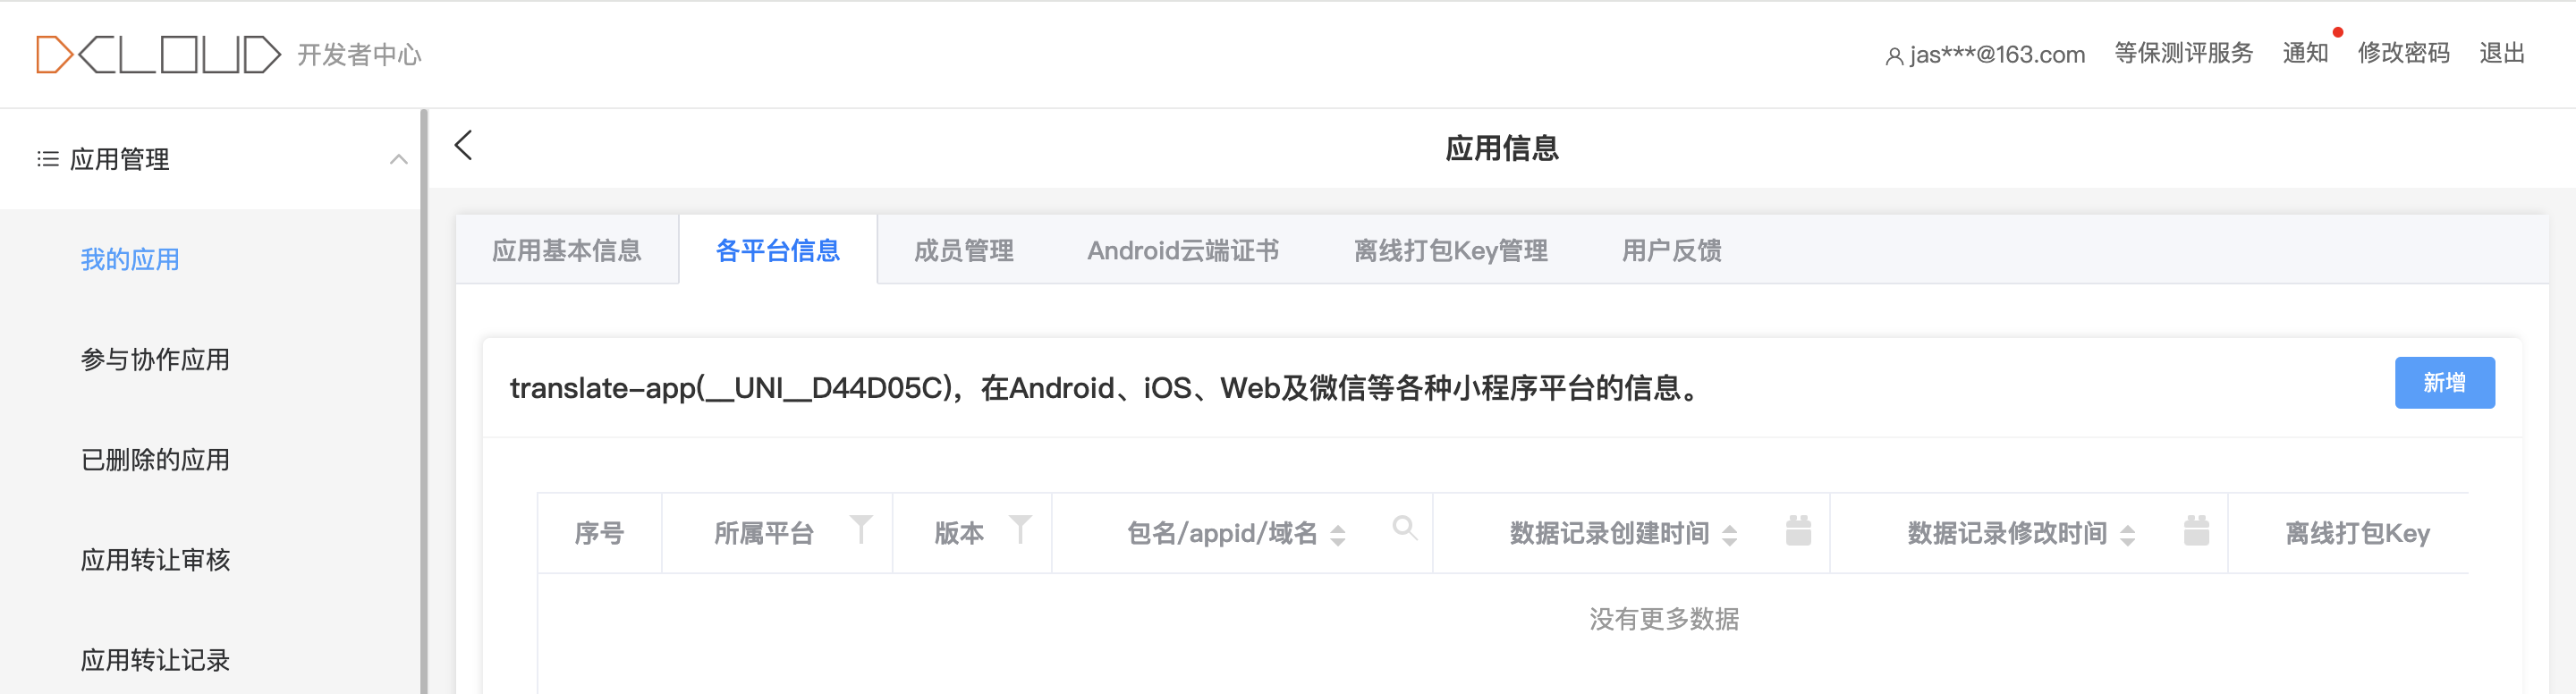
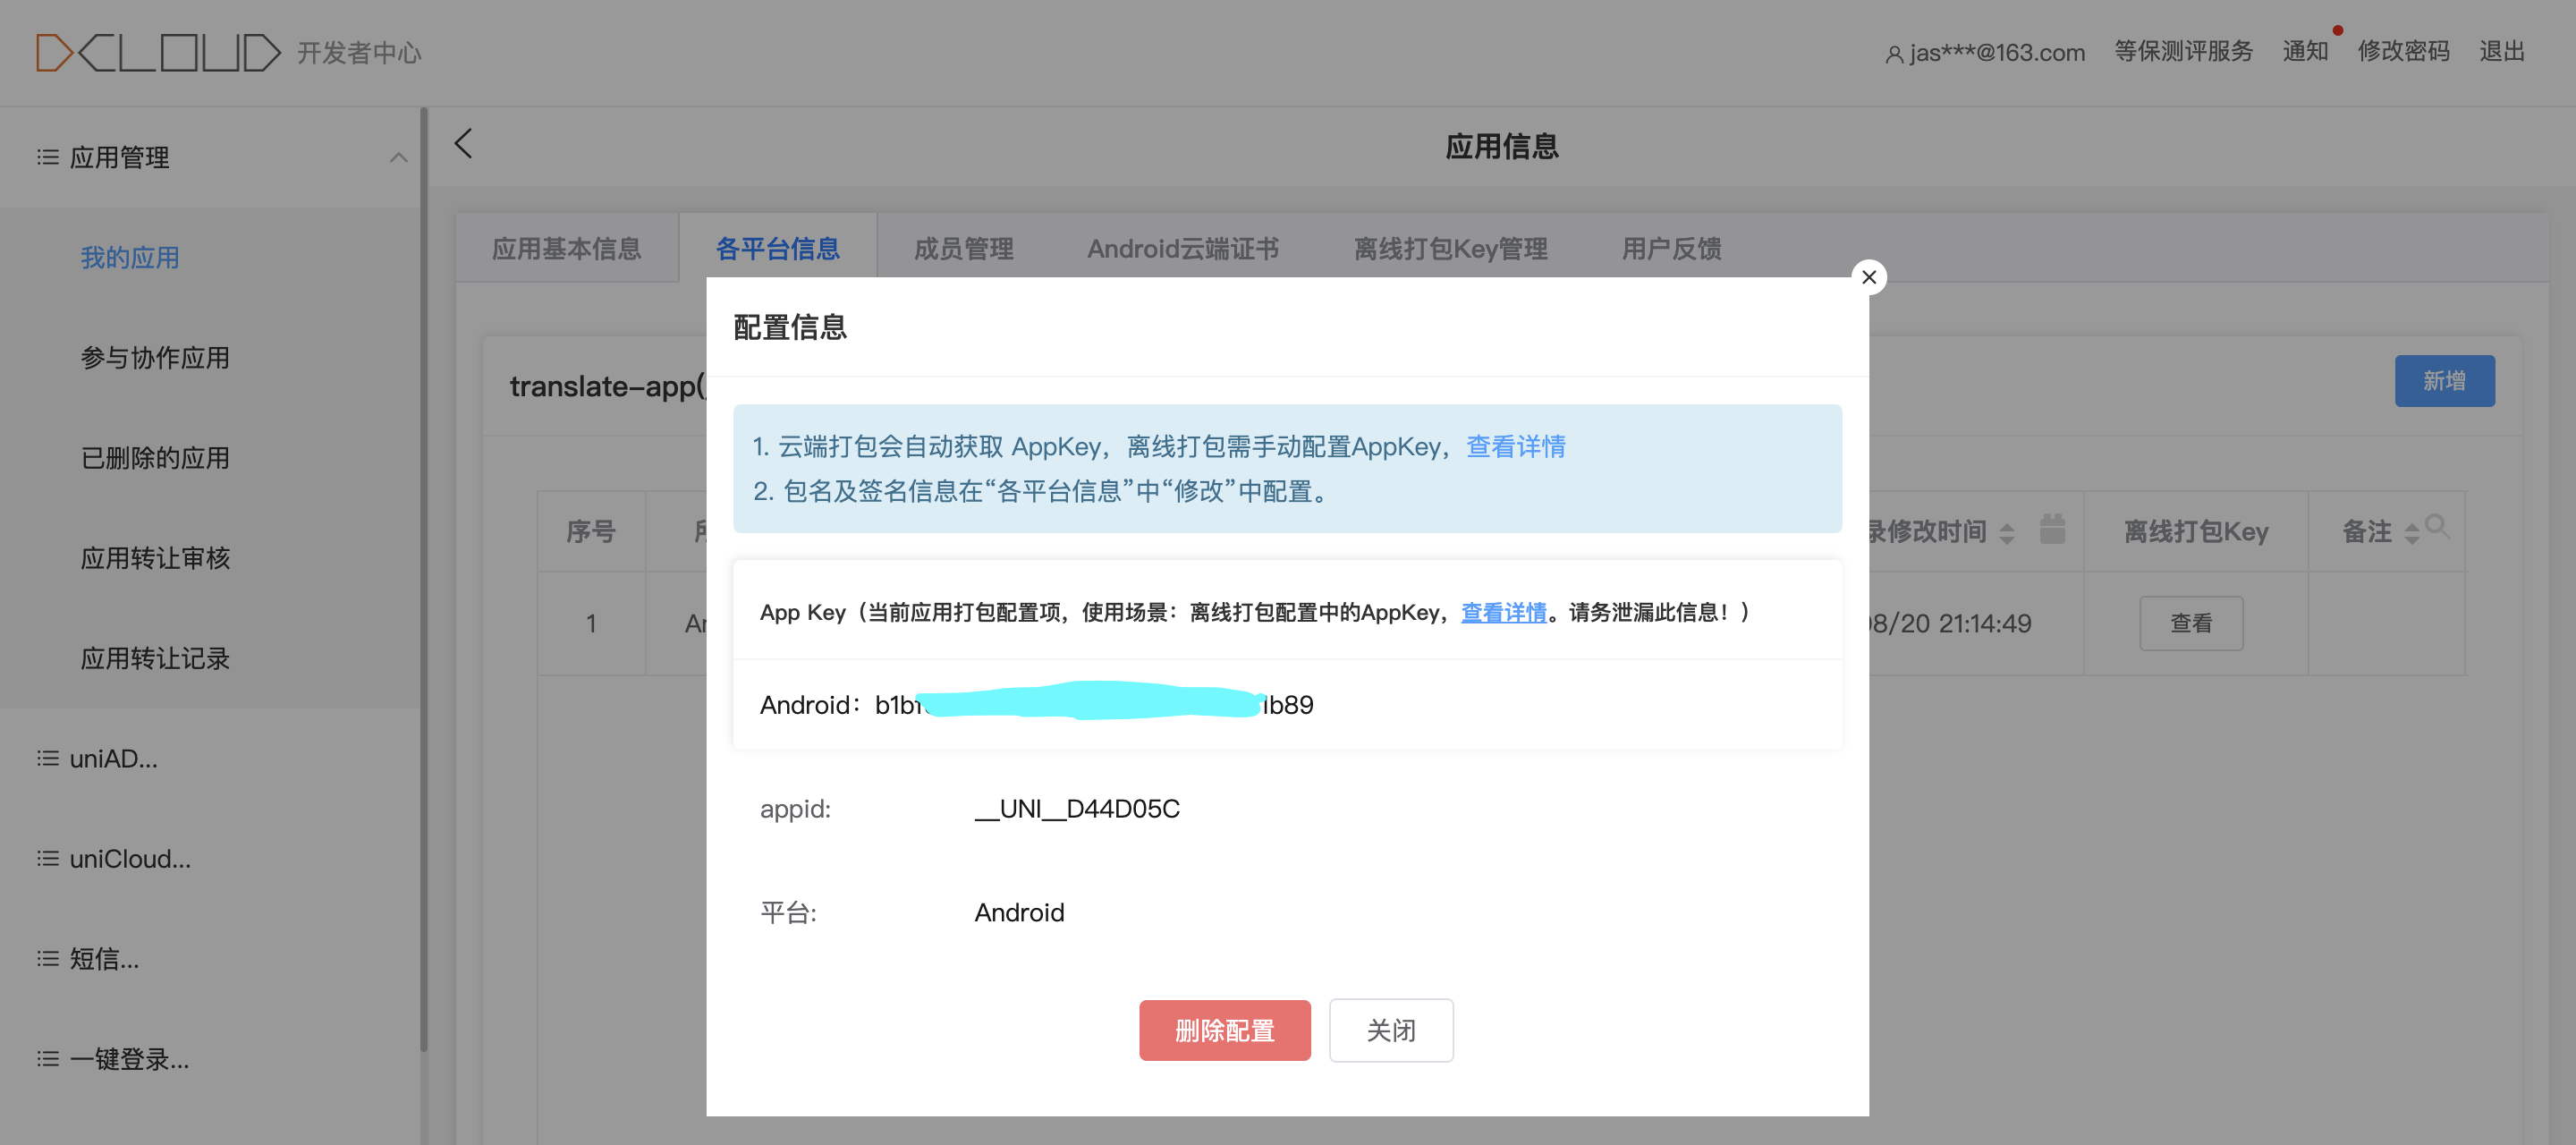
2.3. 生成离线打包key
- 新增
新增时根据证书详情获取创建时的表单信息(只填必填项即可)
- 创建(只要正式版)
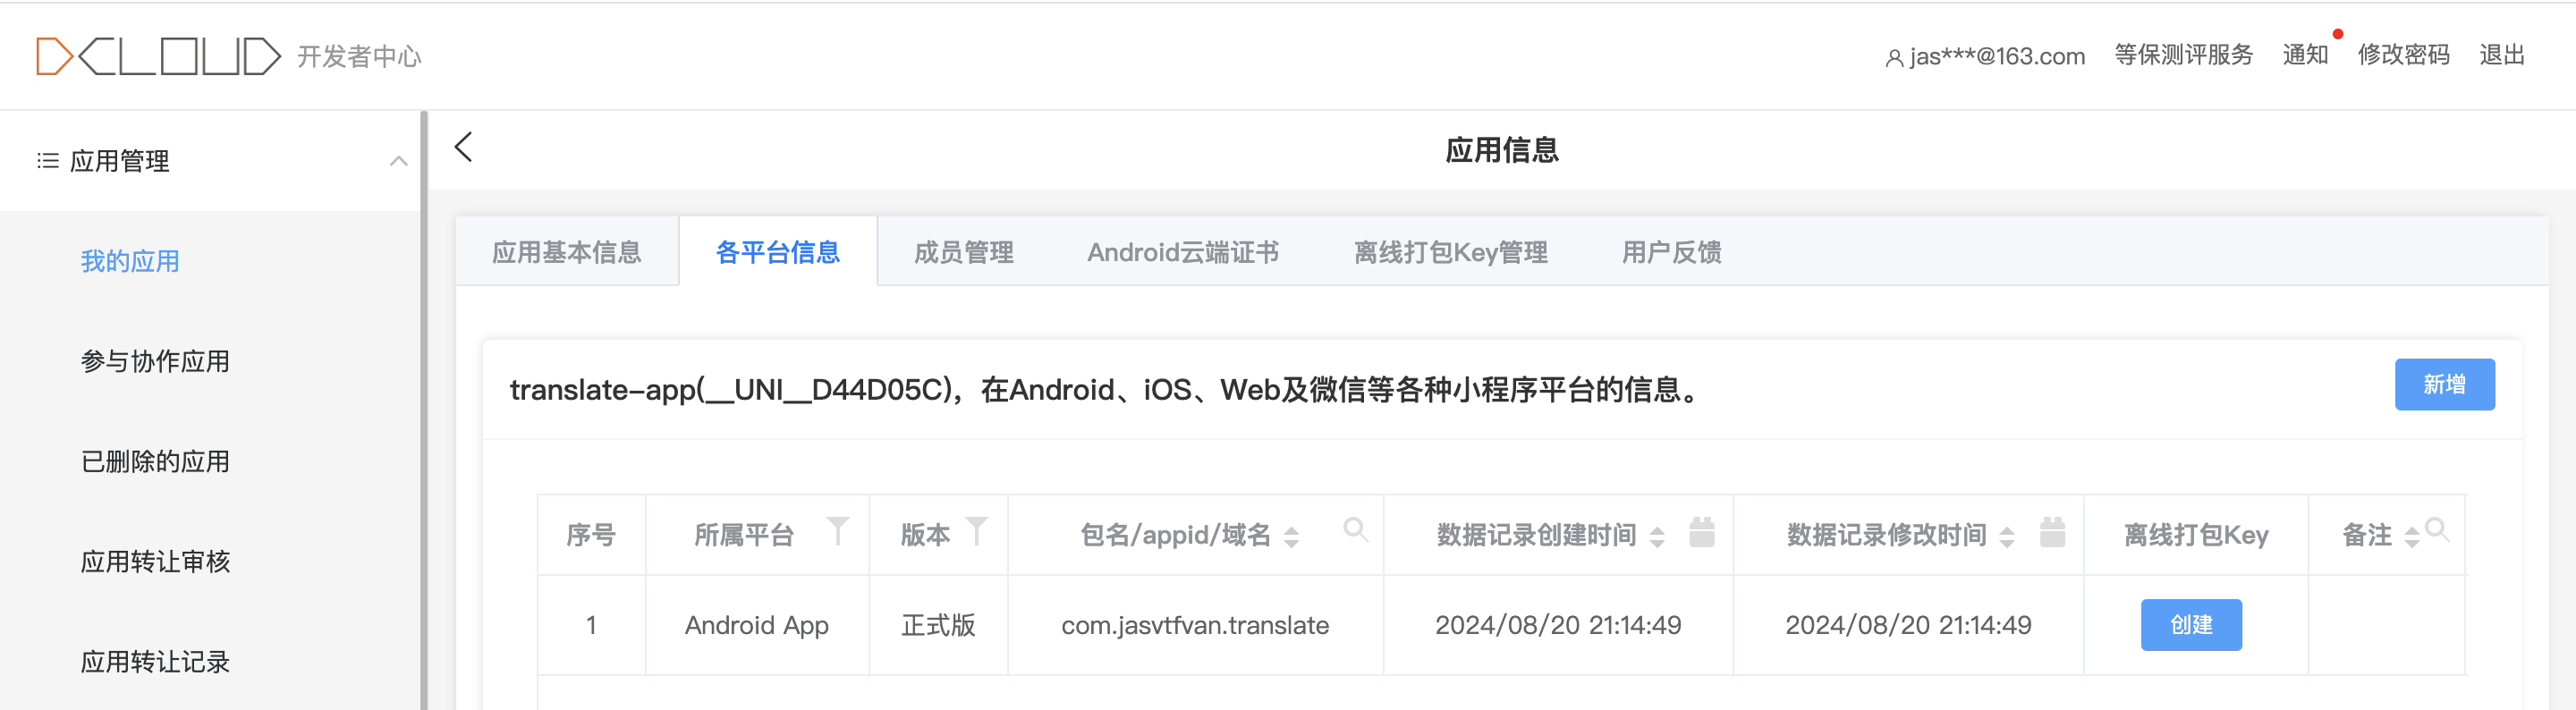
提示
创建时只创建正式版即可,测试版无法在Android Studio中Debug调试
- 查看离线打包key(dcloud_appkey)
3. 离线Android项目
官方文档: https://nativesupport.dcloud.net.cn/AppDocs/usesdk/android.html
各版本
Gradle插件版本 classpath 'com.android.tools.build:gradle:4.1.1'
Gradle版本 distributionUrl=https://services.gradle.org/distributions/gradle-6.5-all.zip
Gradle JDK 1.8.0_422
Compile Sdk Version 30
Build Tools Version 30.0.3
Target SDK Version 34
Min SDK Version 21
Version Code 100
Version Name 1.0.0
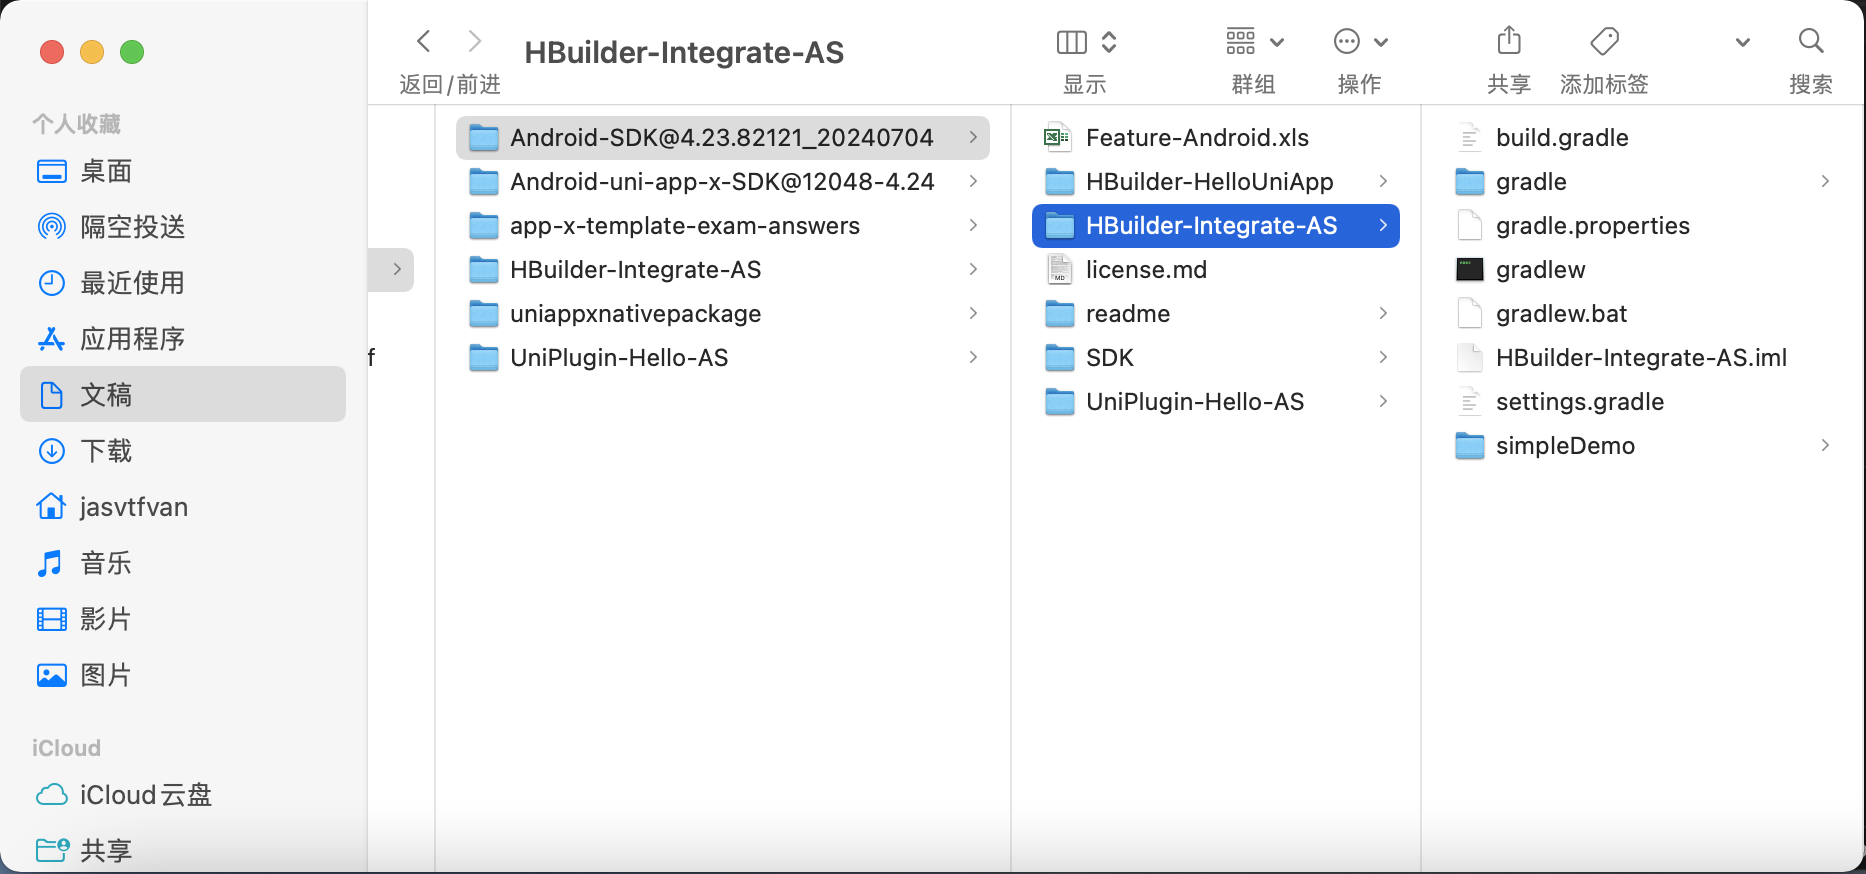
3.1. 导入Android Studio
注意,下载的版本号需要跟
HBuilderX版本号一致
- 复制项目,目录如下
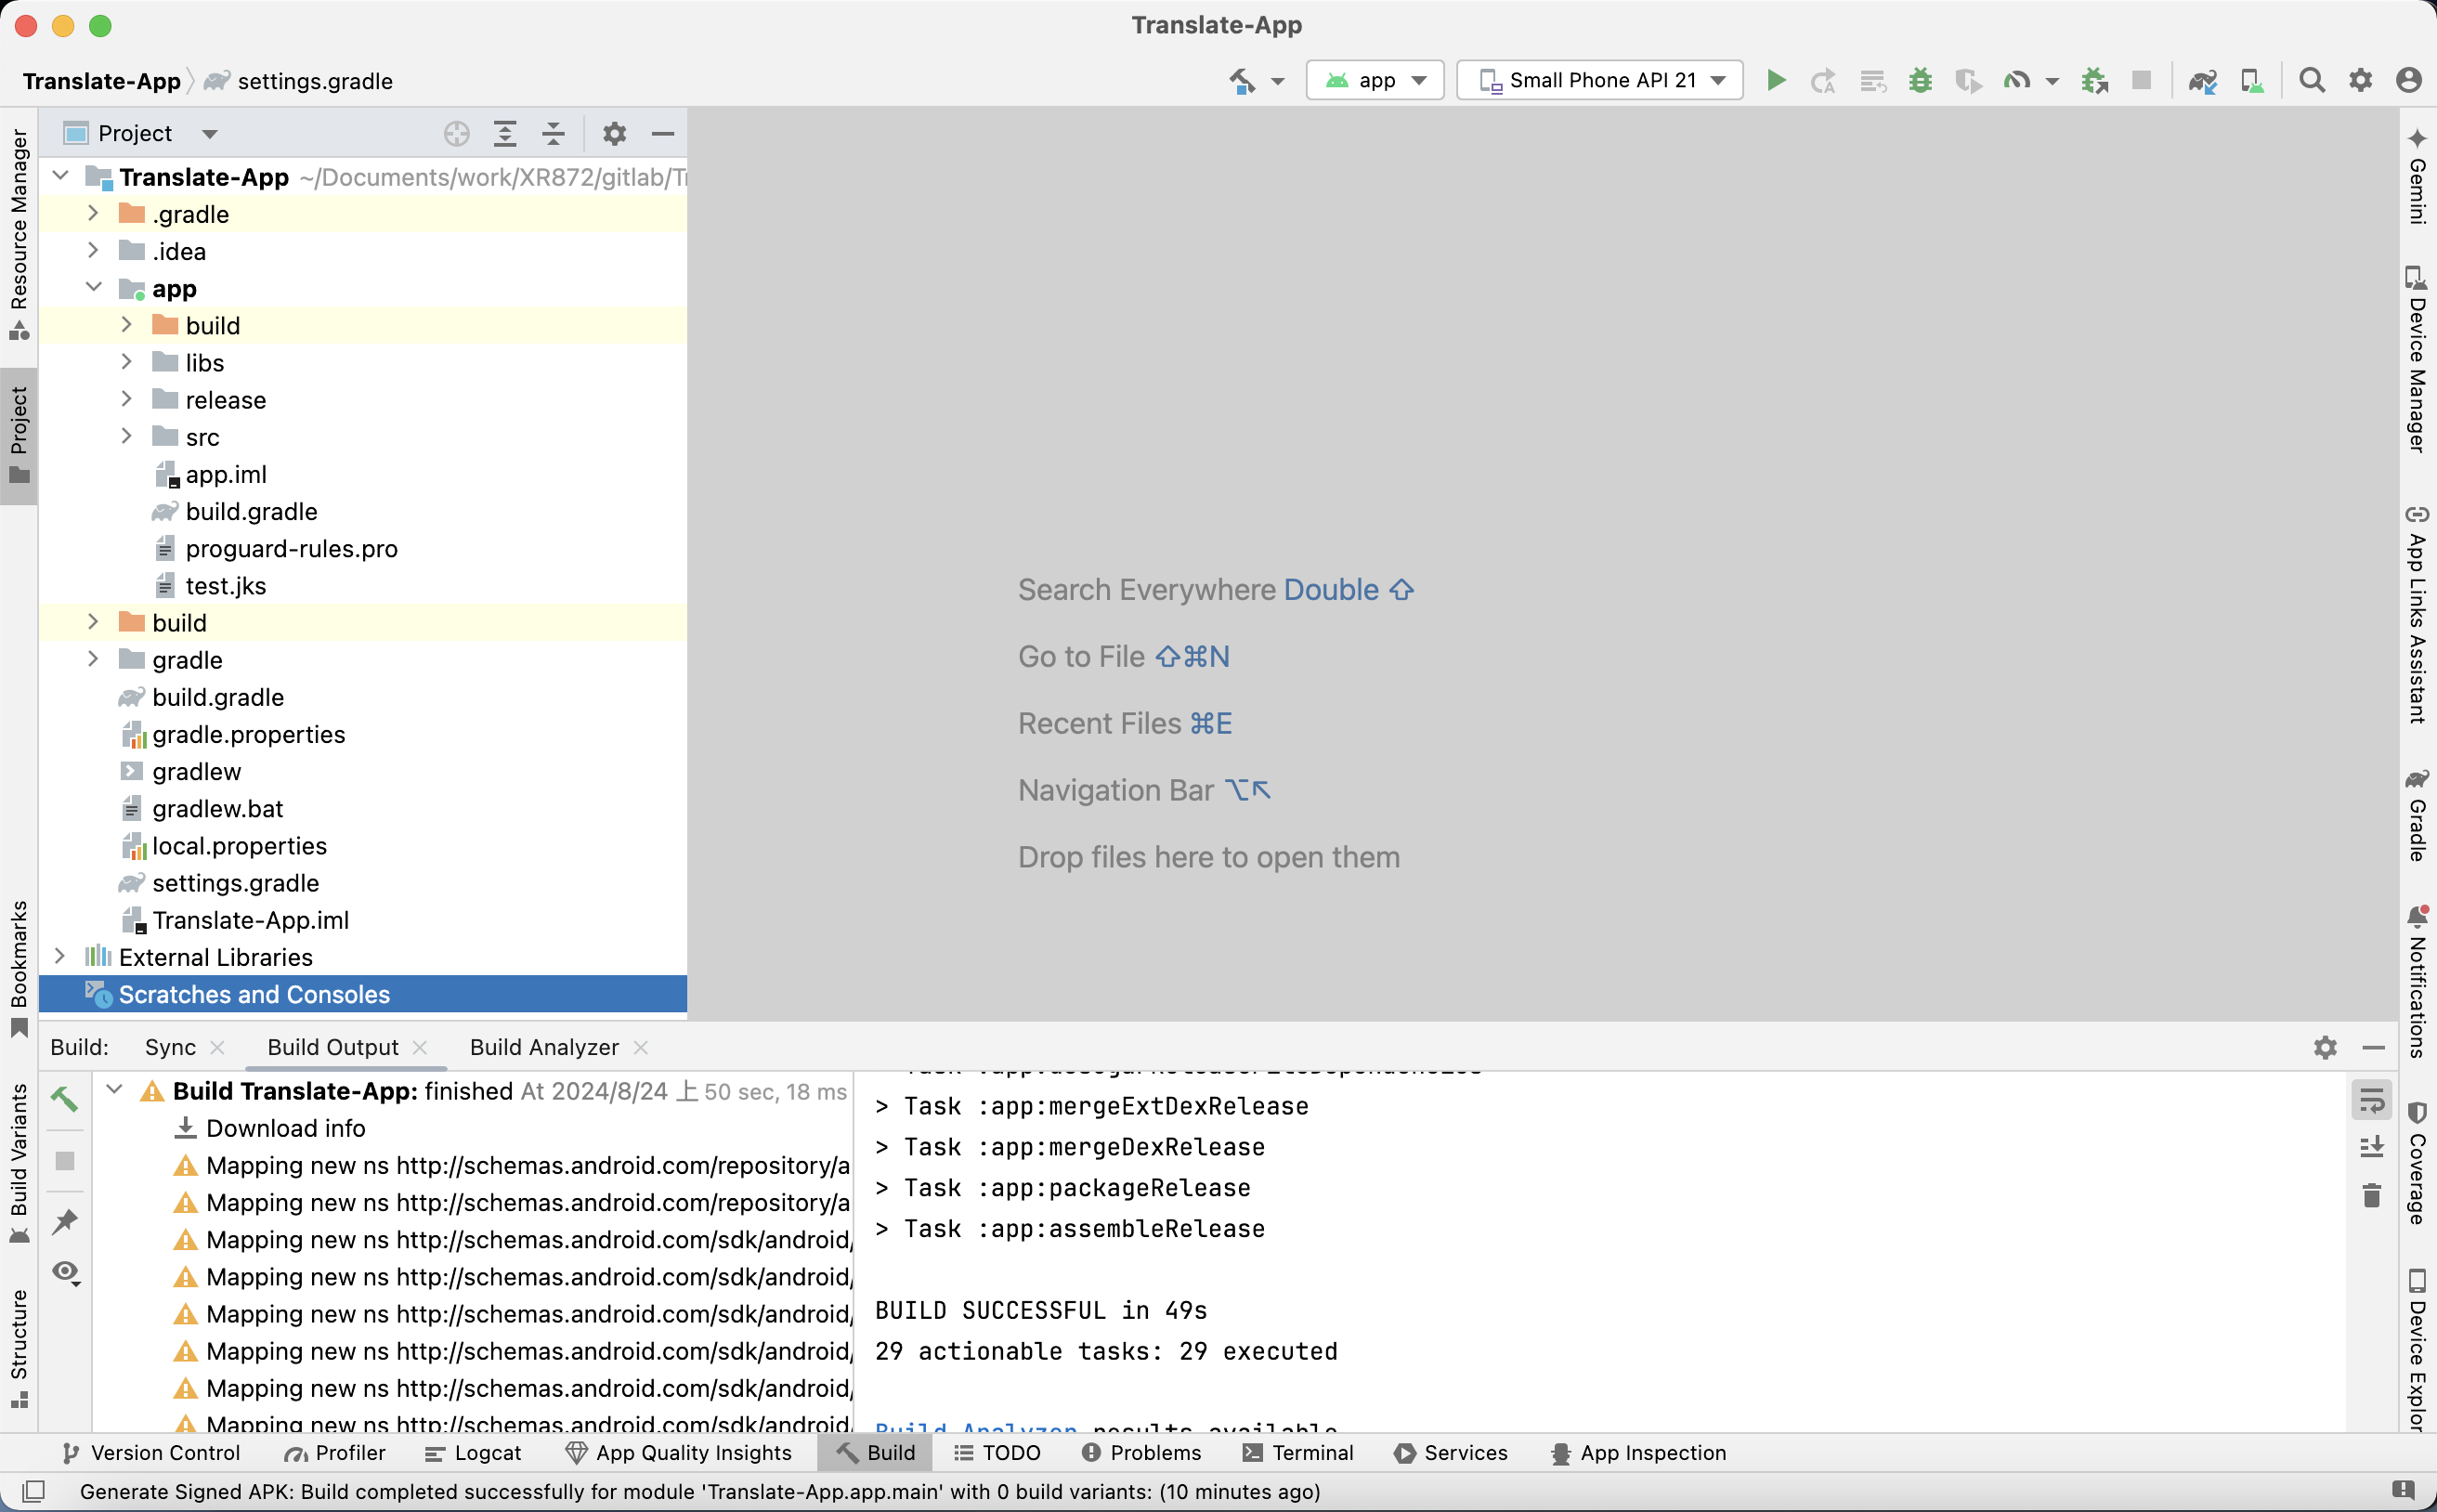
- 修改项目名称、文件夹名称、文件名称
Translate-App Translate-App.iml app app.iml
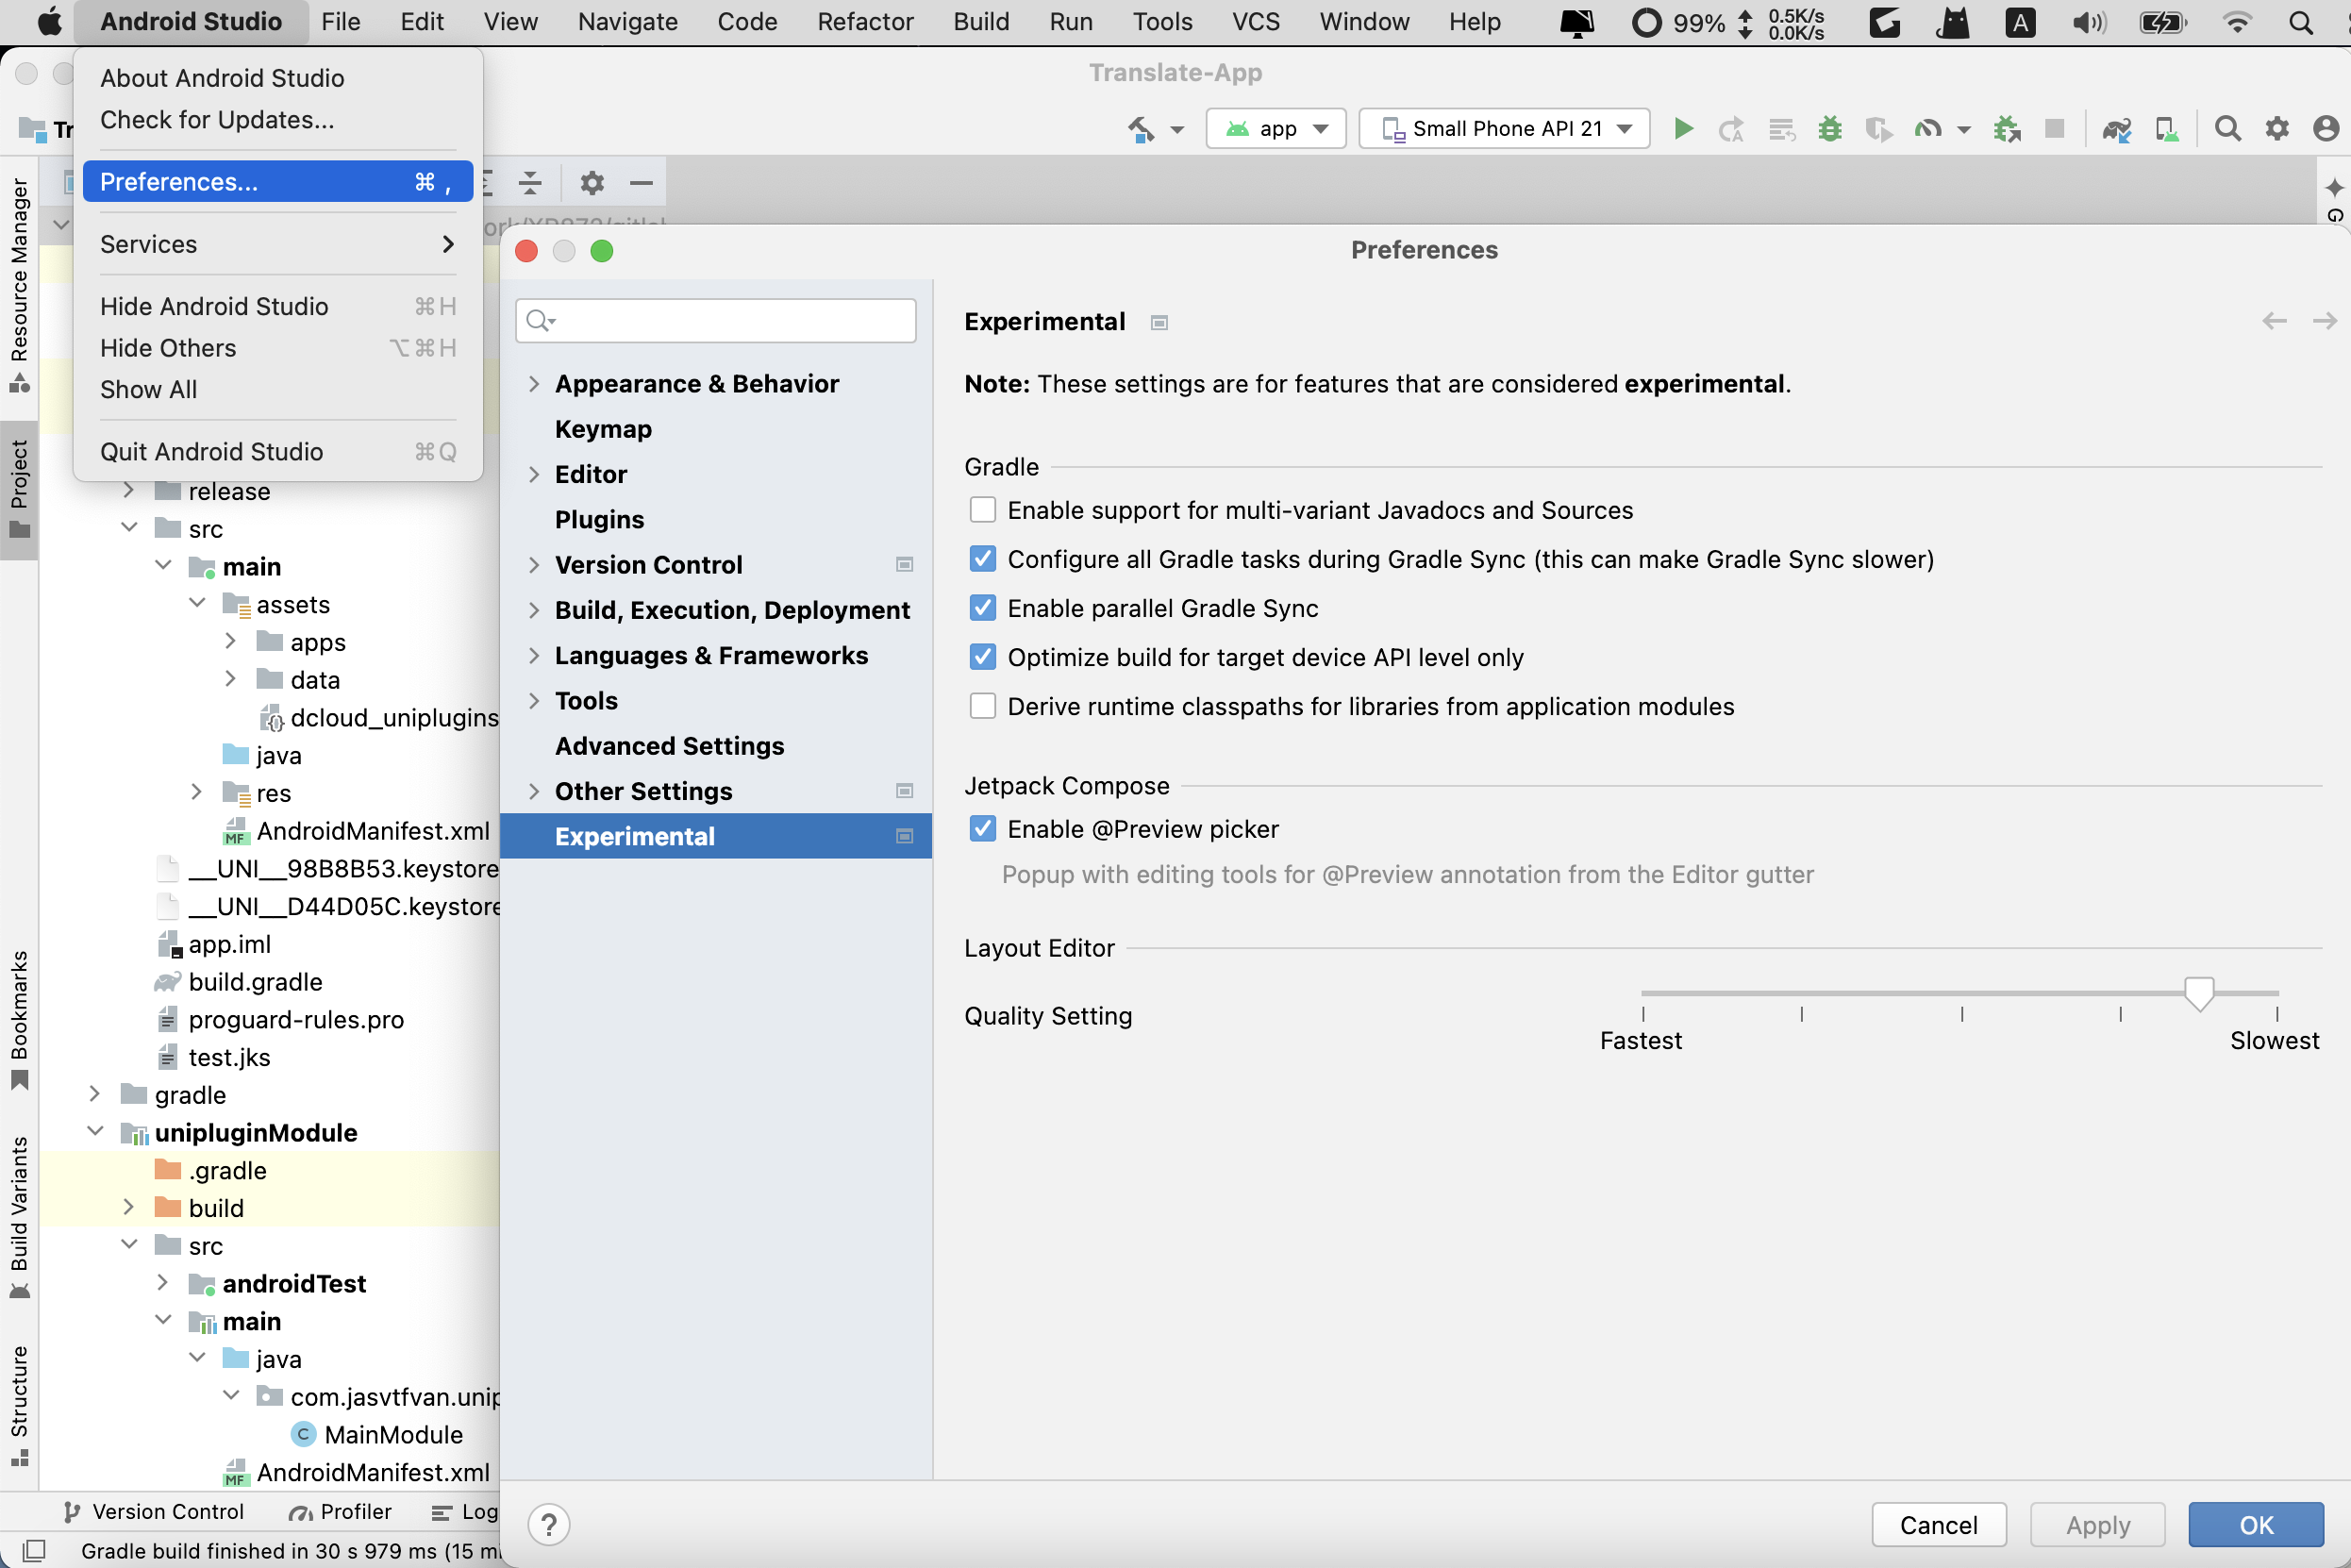
- 修改
Android StudioGradle JDK版本为1.8
- 注意需要
Android Studio下载的安装版本,在Gradle JDK下拉可以点击download
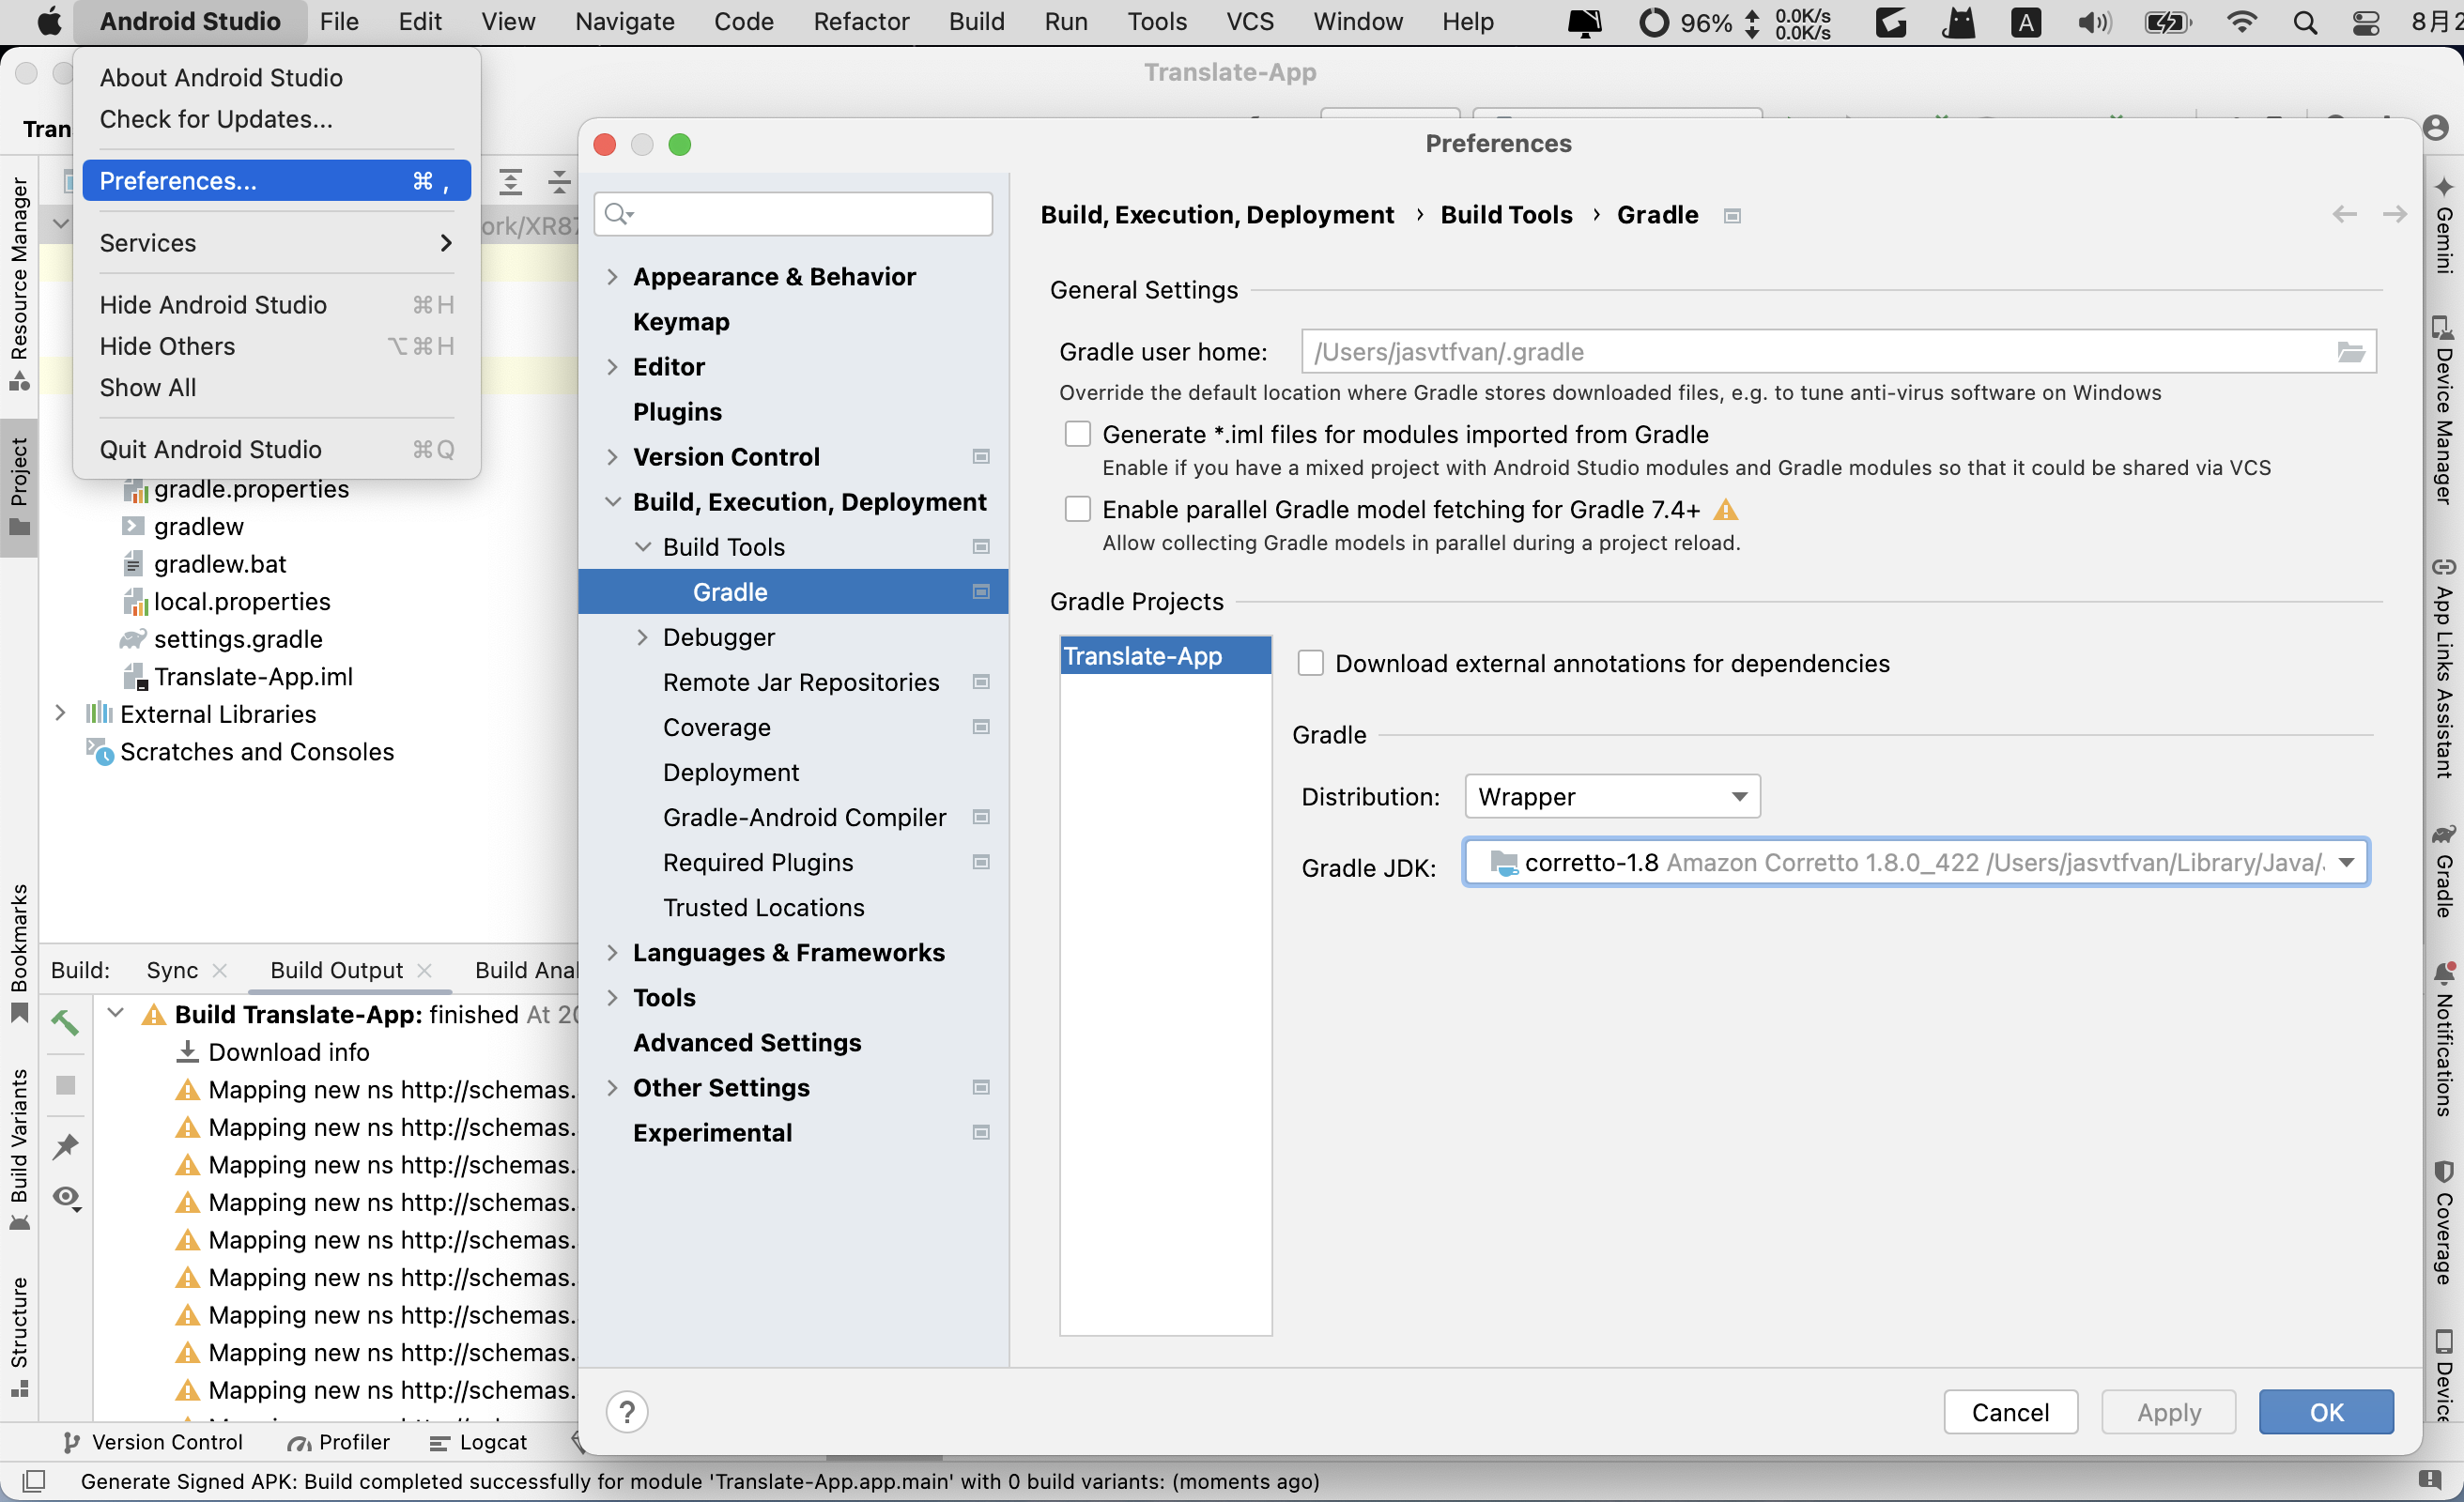
- 配置
Gradle
3.2. 拷贝资源文件
- 生成打包资源
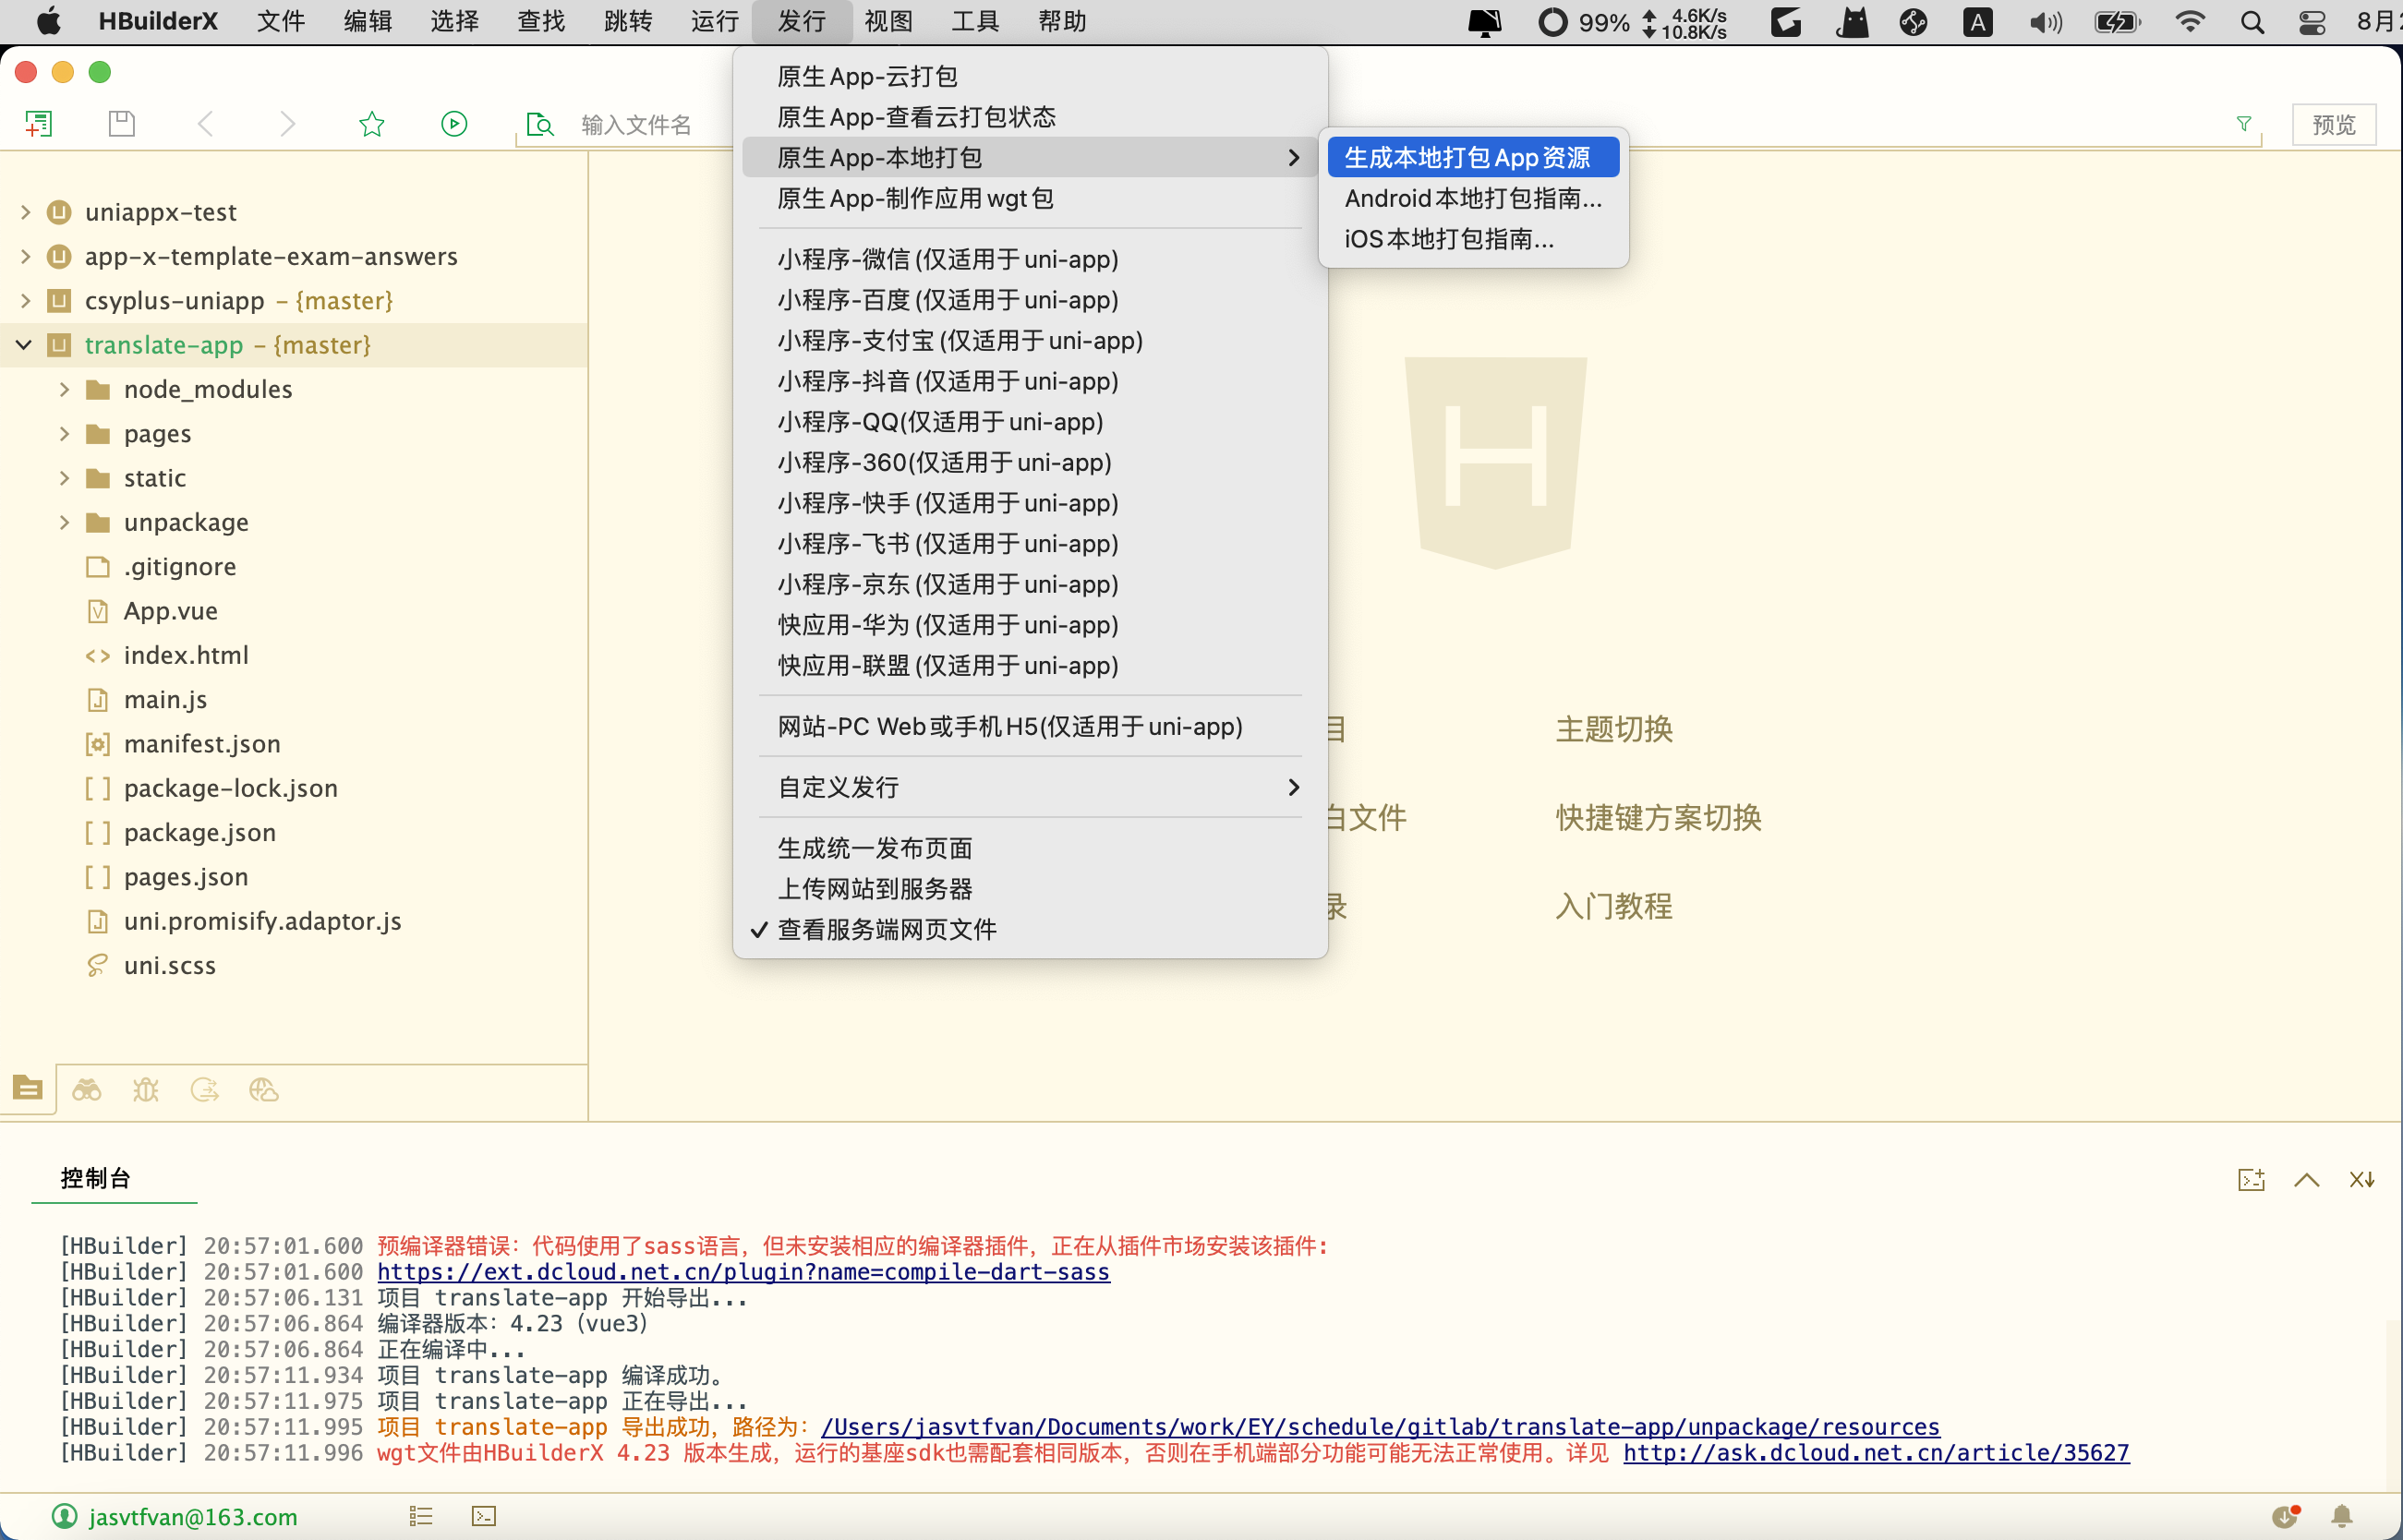
- 从
HBuilderX拷贝静态资源到app主模块
3.3. 配置更新
/Translate-App/app/src/main/Androidmanifest.xml
<?xml version="1.0" encoding="utf-8"?>
<manifest xmlns:android="http://schemas.android.com/apk/res/android"
    package="com.jasvtfvan.translate">
...
<meta-data android:name="dcloud_appkey" android:value="2cec***离线打包key***5d50" />/Translate-App/app/src/main/res/values/strings.xml
<resources>
    <string name="app_name">Translate-App</string>
</resources>/Translate-App/app/src/main/assets/data/dcloud_control.xml
生成自定义基座,需要在根节点下添加debug="true"和syncDebug="true"
<hbuilder debug="true" syncDebug="true">
<apps>
    <app appid="__UNI__98B8B53" appver="1.0.0"/>
</apps>
</hbuilder>/Translate-App/app/build.gradle
从开发者中心下载证书,放到 /Translate-App/app/目录下
apply plugin: 'com.android.application'

android {
    compileSdkVersion 30
    buildToolsVersion '30.0.3'
    defaultConfig {
        applicationId 'com.jasvtfvan.translate'
        minSdkVersion 21
        targetSdkVersion 28
        versionCode 100
        versionName "1.0.0"
        multiDexEnabled true
        ndk {
            abiFilters 'x86', 'armeabi-v7a', 'arm64-v8a'
        }
        compileOptions {
            sourceCompatibility JavaVersion.VERSION_1_8
            targetCompatibility JavaVersion.VERSION_1_8
        }
    }
    signingConfigs {
        config {
            keyAlias '__uni__98B8B53'
            keyPassword '开发者中心证书详情里拿到'
            storeFile file('__UNI__98B8B53.keystore')
            storePassword '同keyPassword'
            v1SigningEnabled true
            v2SigningEnabled true
        }
    }

    buildTypes {
        debug {
            signingConfig signingConfigs.config
            minifyEnabled false
            proguardFiles getDefaultProguardFile('proguard-android-optimize.txt'), 'proguard-rules.pro'
        }
        release {
            signingConfig signingConfigs.config
            minifyEnabled false
            proguardFiles getDefaultProguardFile('proguard-android-optimize.txt'), 'proguard-rules.pro'
        }
    }
    aaptOptions {
        additionalParameters '--auto-add-overlay'
        ignoreAssetsPattern "!.svn:!.git:.*:!CVS:!thumbs.db:!picasa.ini:!*.scc:*~"
    }
}

dependencies {
    implementation fileTree(dir: 'libs', include: ['*.aar', '*.jar'], exclude: [])
    implementation 'androidx.appcompat:appcompat:1.1.0'
    implementation 'androidx.core:core:1.1.0'
    implementation "androidx.fragment:fragment:1.1.0"
    implementation 'androidx.legacy:legacy-support-v4:1.0.0'
    implementation 'androidx.localbroadcastmanager:localbroadcastmanager:1.0.0'
    implementation 'androidx.recyclerview:recyclerview:1.1.0'
    implementation 'androidx.webkit:webkit:1.3.0'
    implementation 'com.alibaba:fastjson:1.2.83'
    implementation 'com.facebook.fresco:fresco:2.5.0'
    implementation "com.facebook.fresco:animated-gif:2.5.0"
    implementation 'com.github.bumptech.glide:glide:4.9.0'

    implementation project(':mylibrary')
}4. 原生插件
4.1 Android Studio
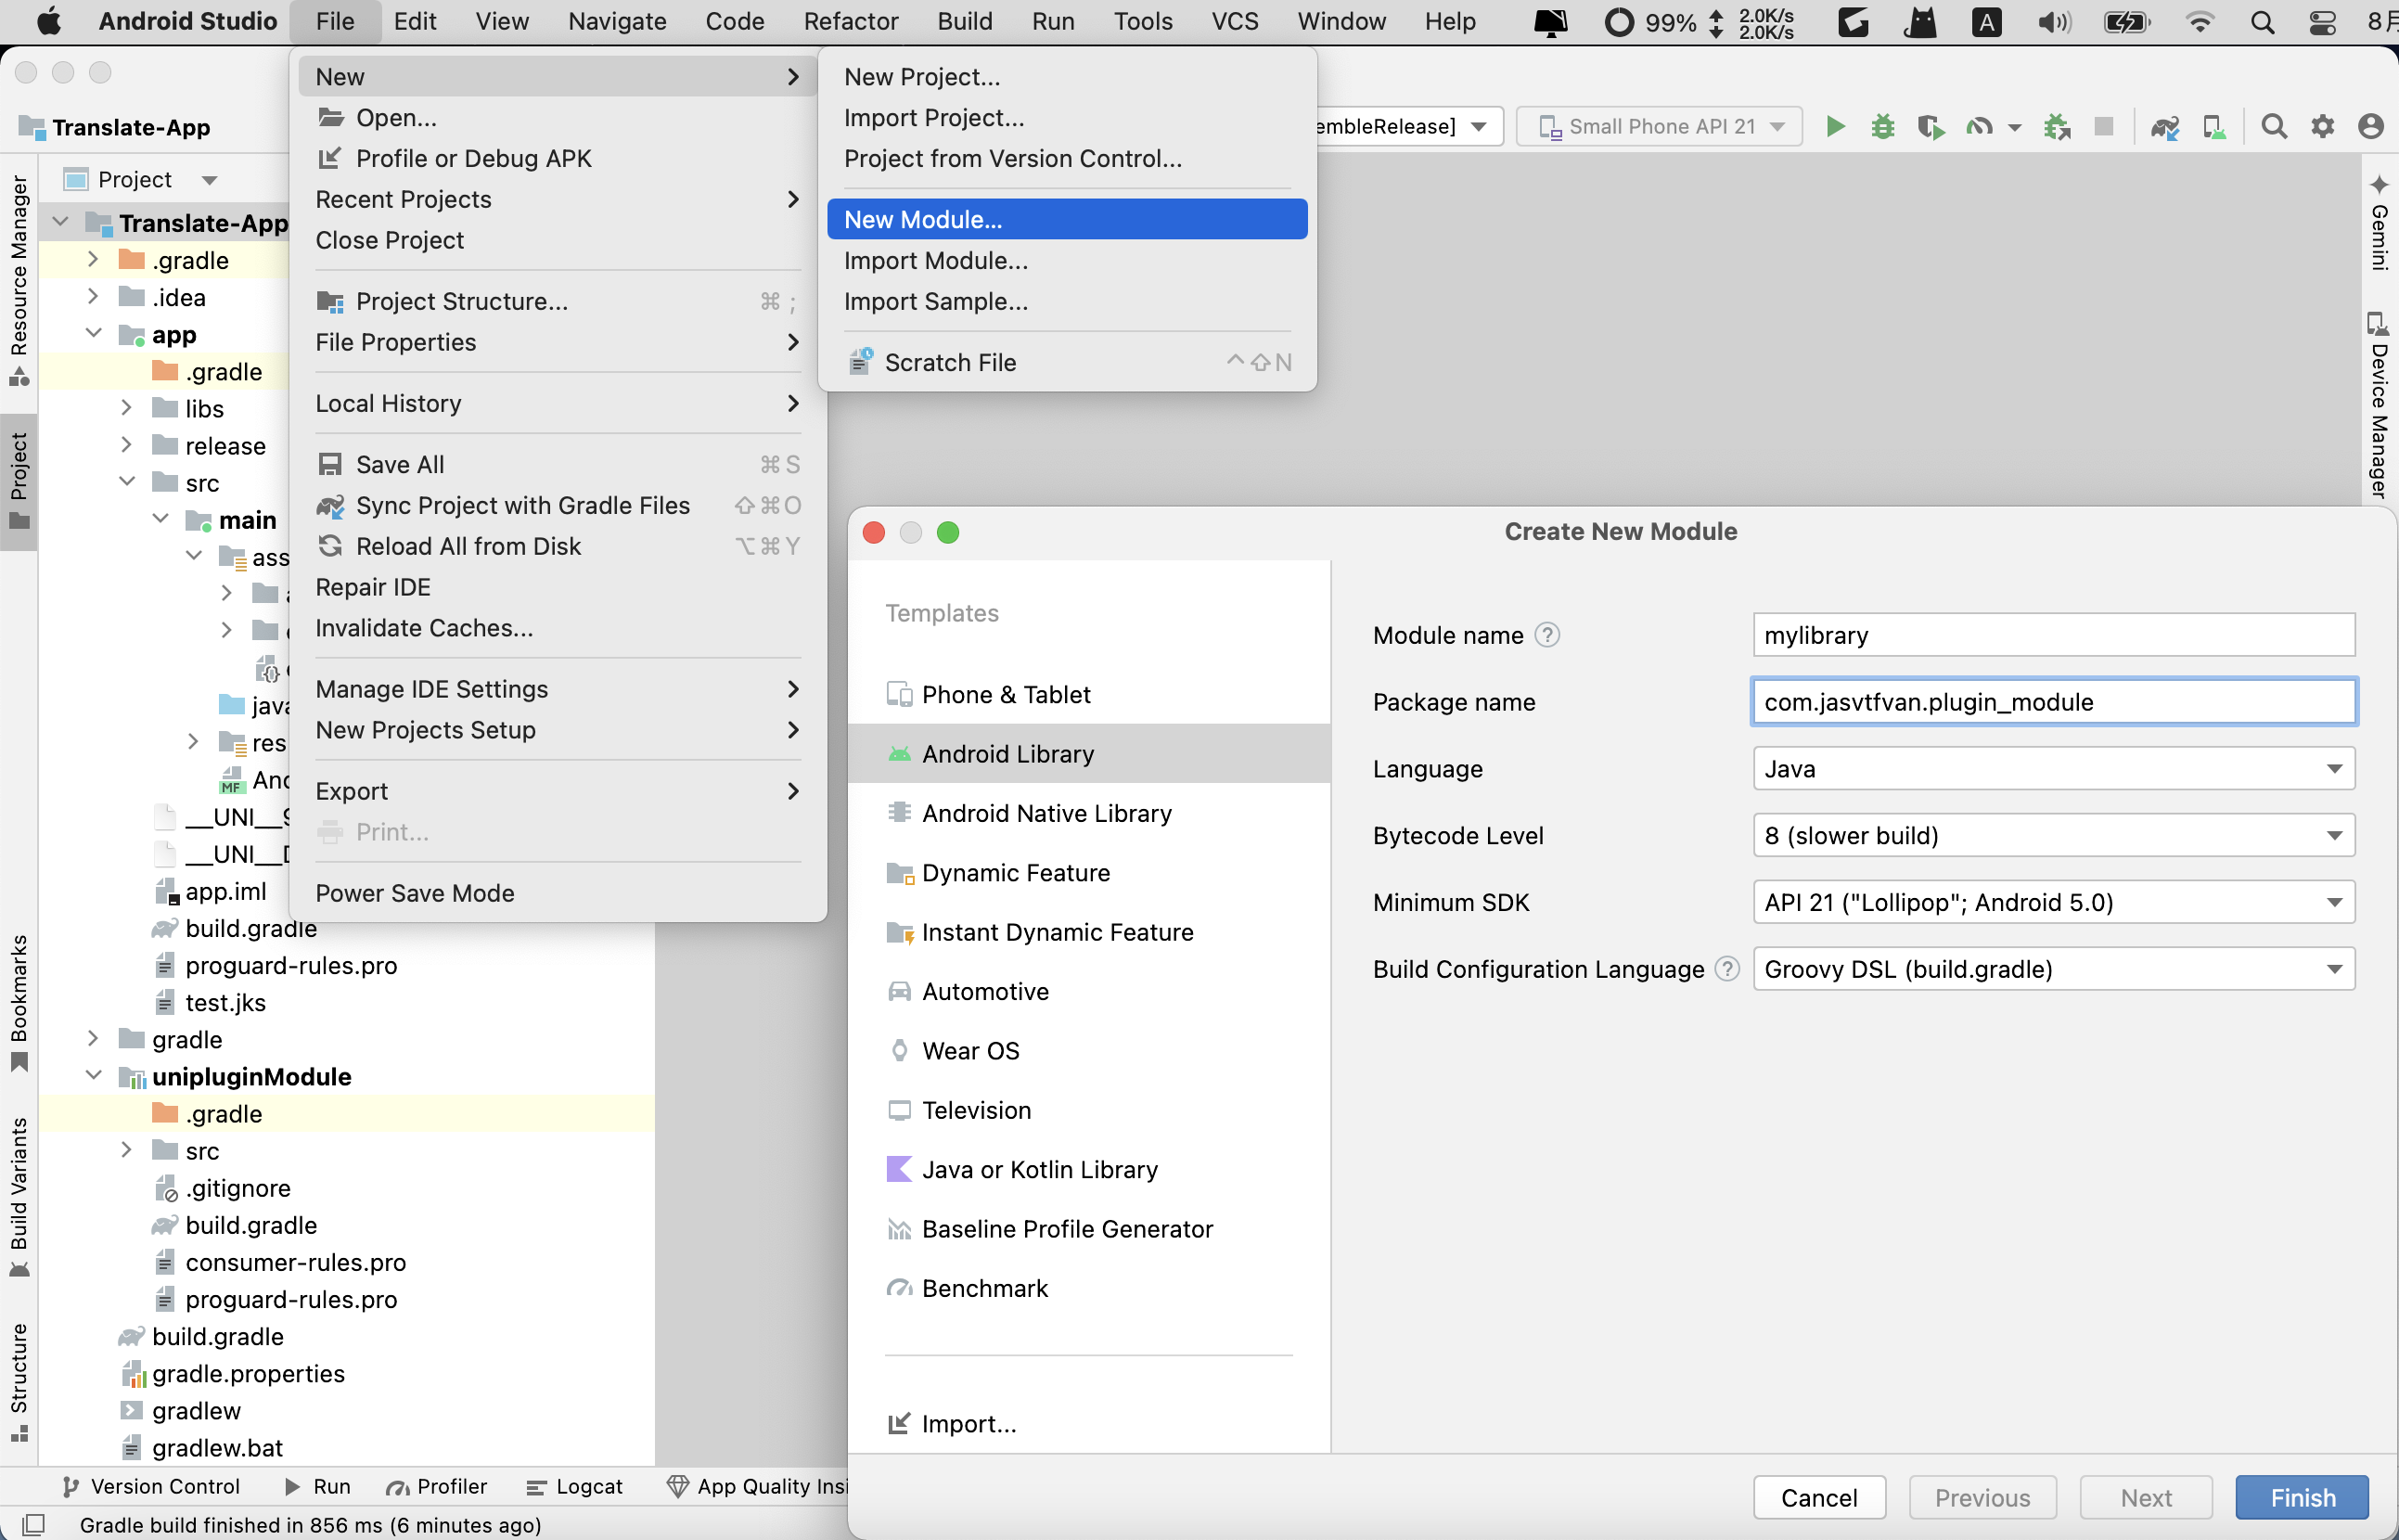
4.1.1. 创建模块
- File -> New -> New Module... -> Android Library
- 更新
/Translate-App/mylibrary/build.gradle
apply plugin: 'com.android.library'

android {
//    namespace 'com.jasvtfvan.plugin_module'
    compileSdkVersion 30

    defaultConfig {
        minSdkVersion 21
        targetSdkVersion 28
        versionCode 100
        versionName "1.0.0"
        testInstrumentationRunner "androidx.test.runner.AndroidJUnitRunner"
        consumerProguardFiles "consumer-rules.pro"
    }

    buildTypes {
        debug {
            minifyEnabled false
            proguardFiles getDefaultProguardFile('proguard-android-optimize.txt'), 'proguard-rules.pro'
        }
        release {
            minifyEnabled false
            proguardFiles getDefaultProguardFile('proguard-android-optimize.txt'), 'proguard-rules.pro'
        }
    }
    compileOptions {
        sourceCompatibility JavaVersion.VERSION_1_8
        targetCompatibility JavaVersion.VERSION_1_8
    }
}

repositories {
    flatDir {
        dirs 'libs'
    }
}
dependencies {
    implementation fileTree(dir: 'libs', include: ['*.jar'])
    compileOnly 'androidx.appcompat:appcompat:1.1.0'
    compileOnly 'androidx.core:core:1.1.0'
    compileOnly 'androidx.fragment:fragment:1.1.0'
    compileOnly 'androidx.legacy:legacy-support-v4:1.0.0'
    compileOnly 'androidx.localbroadcastmanager:localbroadcastmanager:1.0.0'
    compileOnly 'androidx.recyclerview:recyclerview:1.1.0'
    compileOnly 'com.alibaba:fastjson:1.2.83'
    compileOnly 'com.facebook.fresco:fresco:2.5.0'
//    compileOnly 'com.google.android.material:material:1.10.0'

    compileOnly fileTree(include: ['uniapp-v8-release.aar'], dir: '../app/libs')

    testImplementation 'junit:junit:4.13.2'
    androidTestImplementation 'androidx.test.ext:junit:1.1.5'
    androidTestImplementation 'androidx.test.espresso:espresso-core:3.5.1'
}如果遇到build.gradle配置文件报错,即配置选项与gradle版本不匹配,可以去官网查询对应版本的配置,或者通过二分法逐行注释重试
/Translate-App/gradle/gradle-wrapper.properties查看gradle版本号
/Translate-App/build.gradle查看gradle插件版本号
比如当前gradle版本为6.5,则根据6.5版本的配置,
namespace是多余的选项
- 更新
/Translate-App/mylibrary/src/main/AndroidManifest.xml
<?xml version="1.0" encoding="utf-8"?>
<manifest xmlns:android="http://schemas.android.com/apk/res/android"
    package="com.jasvtfvan.plugin_module">

</manifest>- 更新
/Translate-App/mylibrary/proguard-rules.pro
# ...
-keep public class * extends io.dcloud.feature.uniapp.common.UniModule{*;}- 创建
/Translate-App/mylibrary/src/main/java/com/jasvtfvan/plugin_module/TestModule.java
package com.jasvtfvan.plugin_module;

import android.util.Log;

import org.json.JSONObject;

import io.dcloud.feature.uniapp.annotation.UniJSMethod;
import io.dcloud.feature.uniapp.bridge.UniJSCallback;
import io.dcloud.feature.uniapp.common.UniModule;

public class TestModule extends UniModule {

    String TAG = "TestModule";

    //run ui thread
    @UniJSMethod(uiThread = true)
    public void testAsyncFunc(String param, UniJSCallback callback) {
        try {
            JSONObject data = new JSONObject(param);
            Log.e(TAG, "testAsyncFunc--:"+data);
            if(callback != null) {
                data.put("code", "success");
                callback.invoke(data.toString());
            }
        } catch (Exception e) {
            e.printStackTrace();
        }
    }

    //run JS thread
    @UniJSMethod (uiThread = false)
    public String testSyncFunc(String param) throws Exception{
        Log.e(TAG, "testSyncFunc--"+param);
        JSONObject data = new JSONObject();
        data.put("code", "success");
        return data.toString();
    }

}4.1.2. 主模块配置
/Translate-App/settings.gradle
include ':app'
include ':mylibrary'- 更新
/Translate-App/app/build.gradle
...
dependencies {
    implementation fileTree(dir: 'libs', include: ['*.aar', '*.jar'], exclude: [])
    implementation 'androidx.appcompat:appcompat:1.1.0'
    implementation 'androidx.core:core:1.1.0'
    implementation "androidx.fragment:fragment:1.1.0"
    implementation 'androidx.legacy:legacy-support-v4:1.0.0'
    implementation 'androidx.localbroadcastmanager:localbroadcastmanager:1.0.0'
    implementation 'androidx.recyclerview:recyclerview:1.1.0'
    implementation 'androidx.webkit:webkit:1.3.0'
    implementation 'com.alibaba:fastjson:1.2.83'
    implementation 'com.facebook.fresco:fresco:2.5.0'
    implementation "com.facebook.fresco:animated-gif:2.5.0"
    implementation 'com.github.bumptech.glide:glide:4.9.0'

    implementation project(':mylibrary')
}- 创建
dcloud_uniplugins.json
/Translate-App/app/src/main/assets/dcloud_uniplugins.json
{
  "nativePlugins": [
    {
      "plugins": [
        {
          "type": "module",
          "name": "TestModule",
          "class": "com.jasvtfvan.plugin_module.TestModule"
        }
      ]
    }
  ]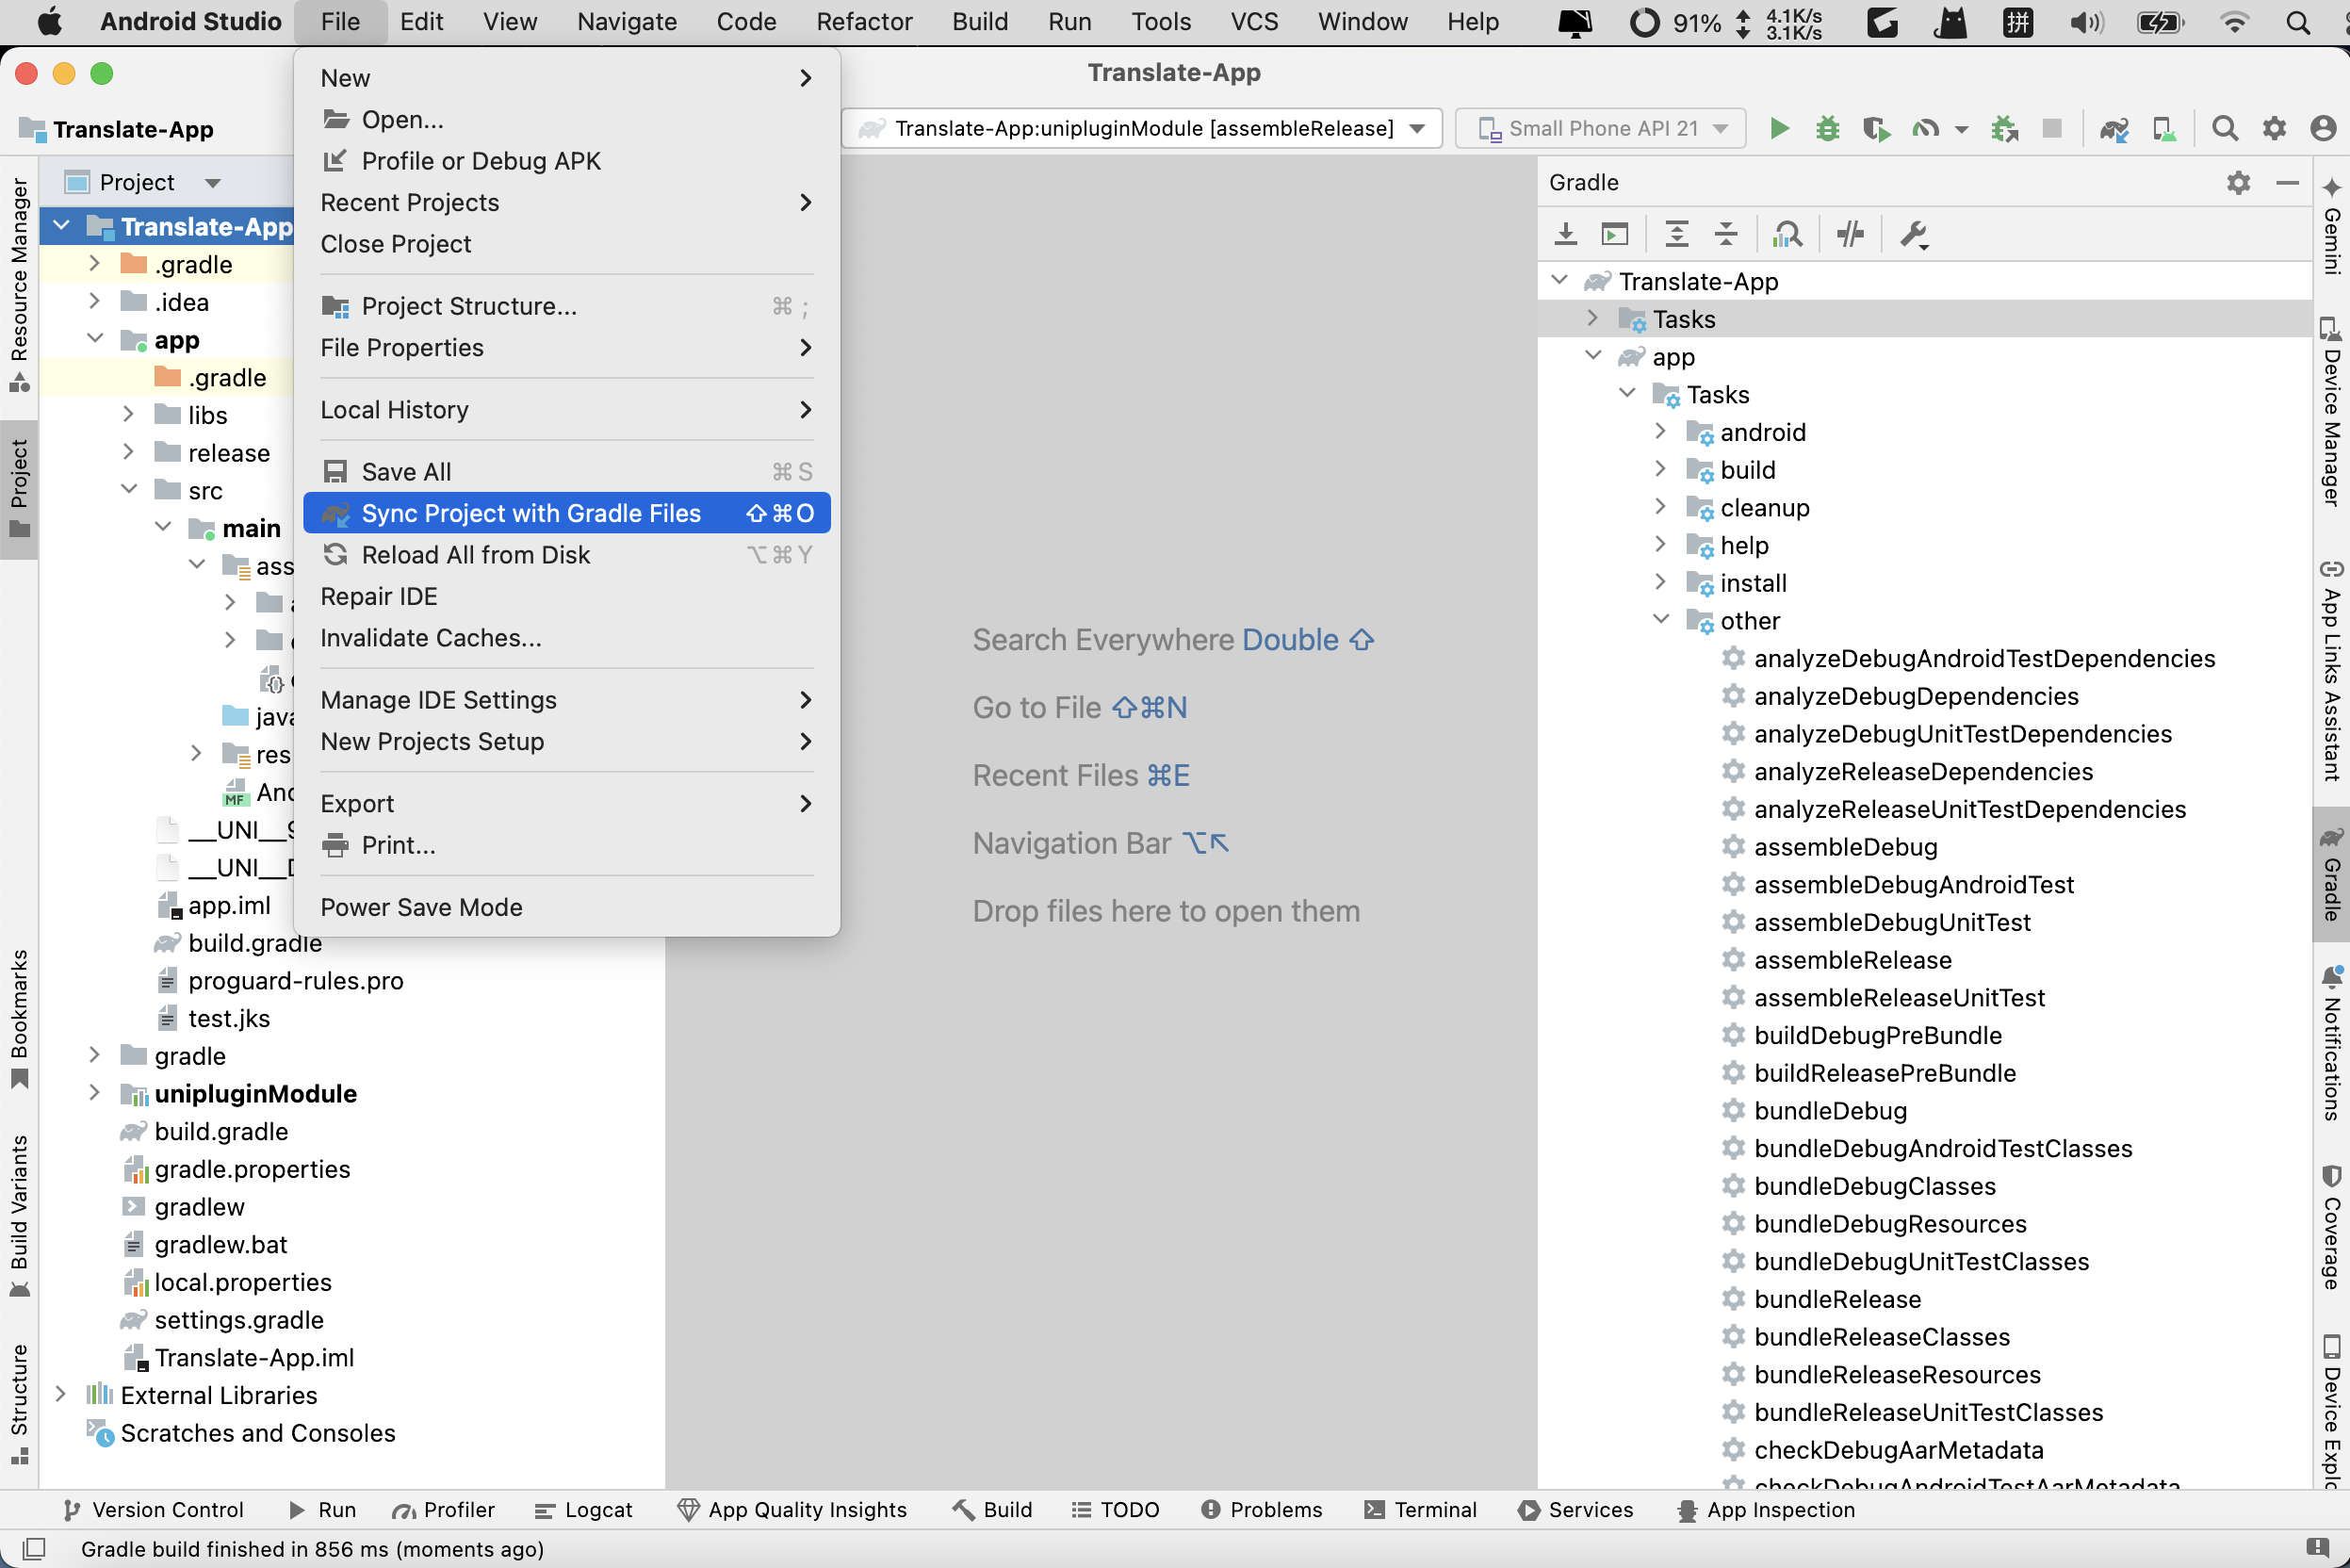
}4.1.3. 插件打包
提示
插件打包用于HBuilderX调试
- 利用
Gradle打包
Android Studio侧边栏Gradle -> Translate-App -> Tasks -> other -> assembleRelease

- 拷贝
mylibrary-release.aar文件,路径在
/Translate-App/mylibrary/build/outputs/aar/
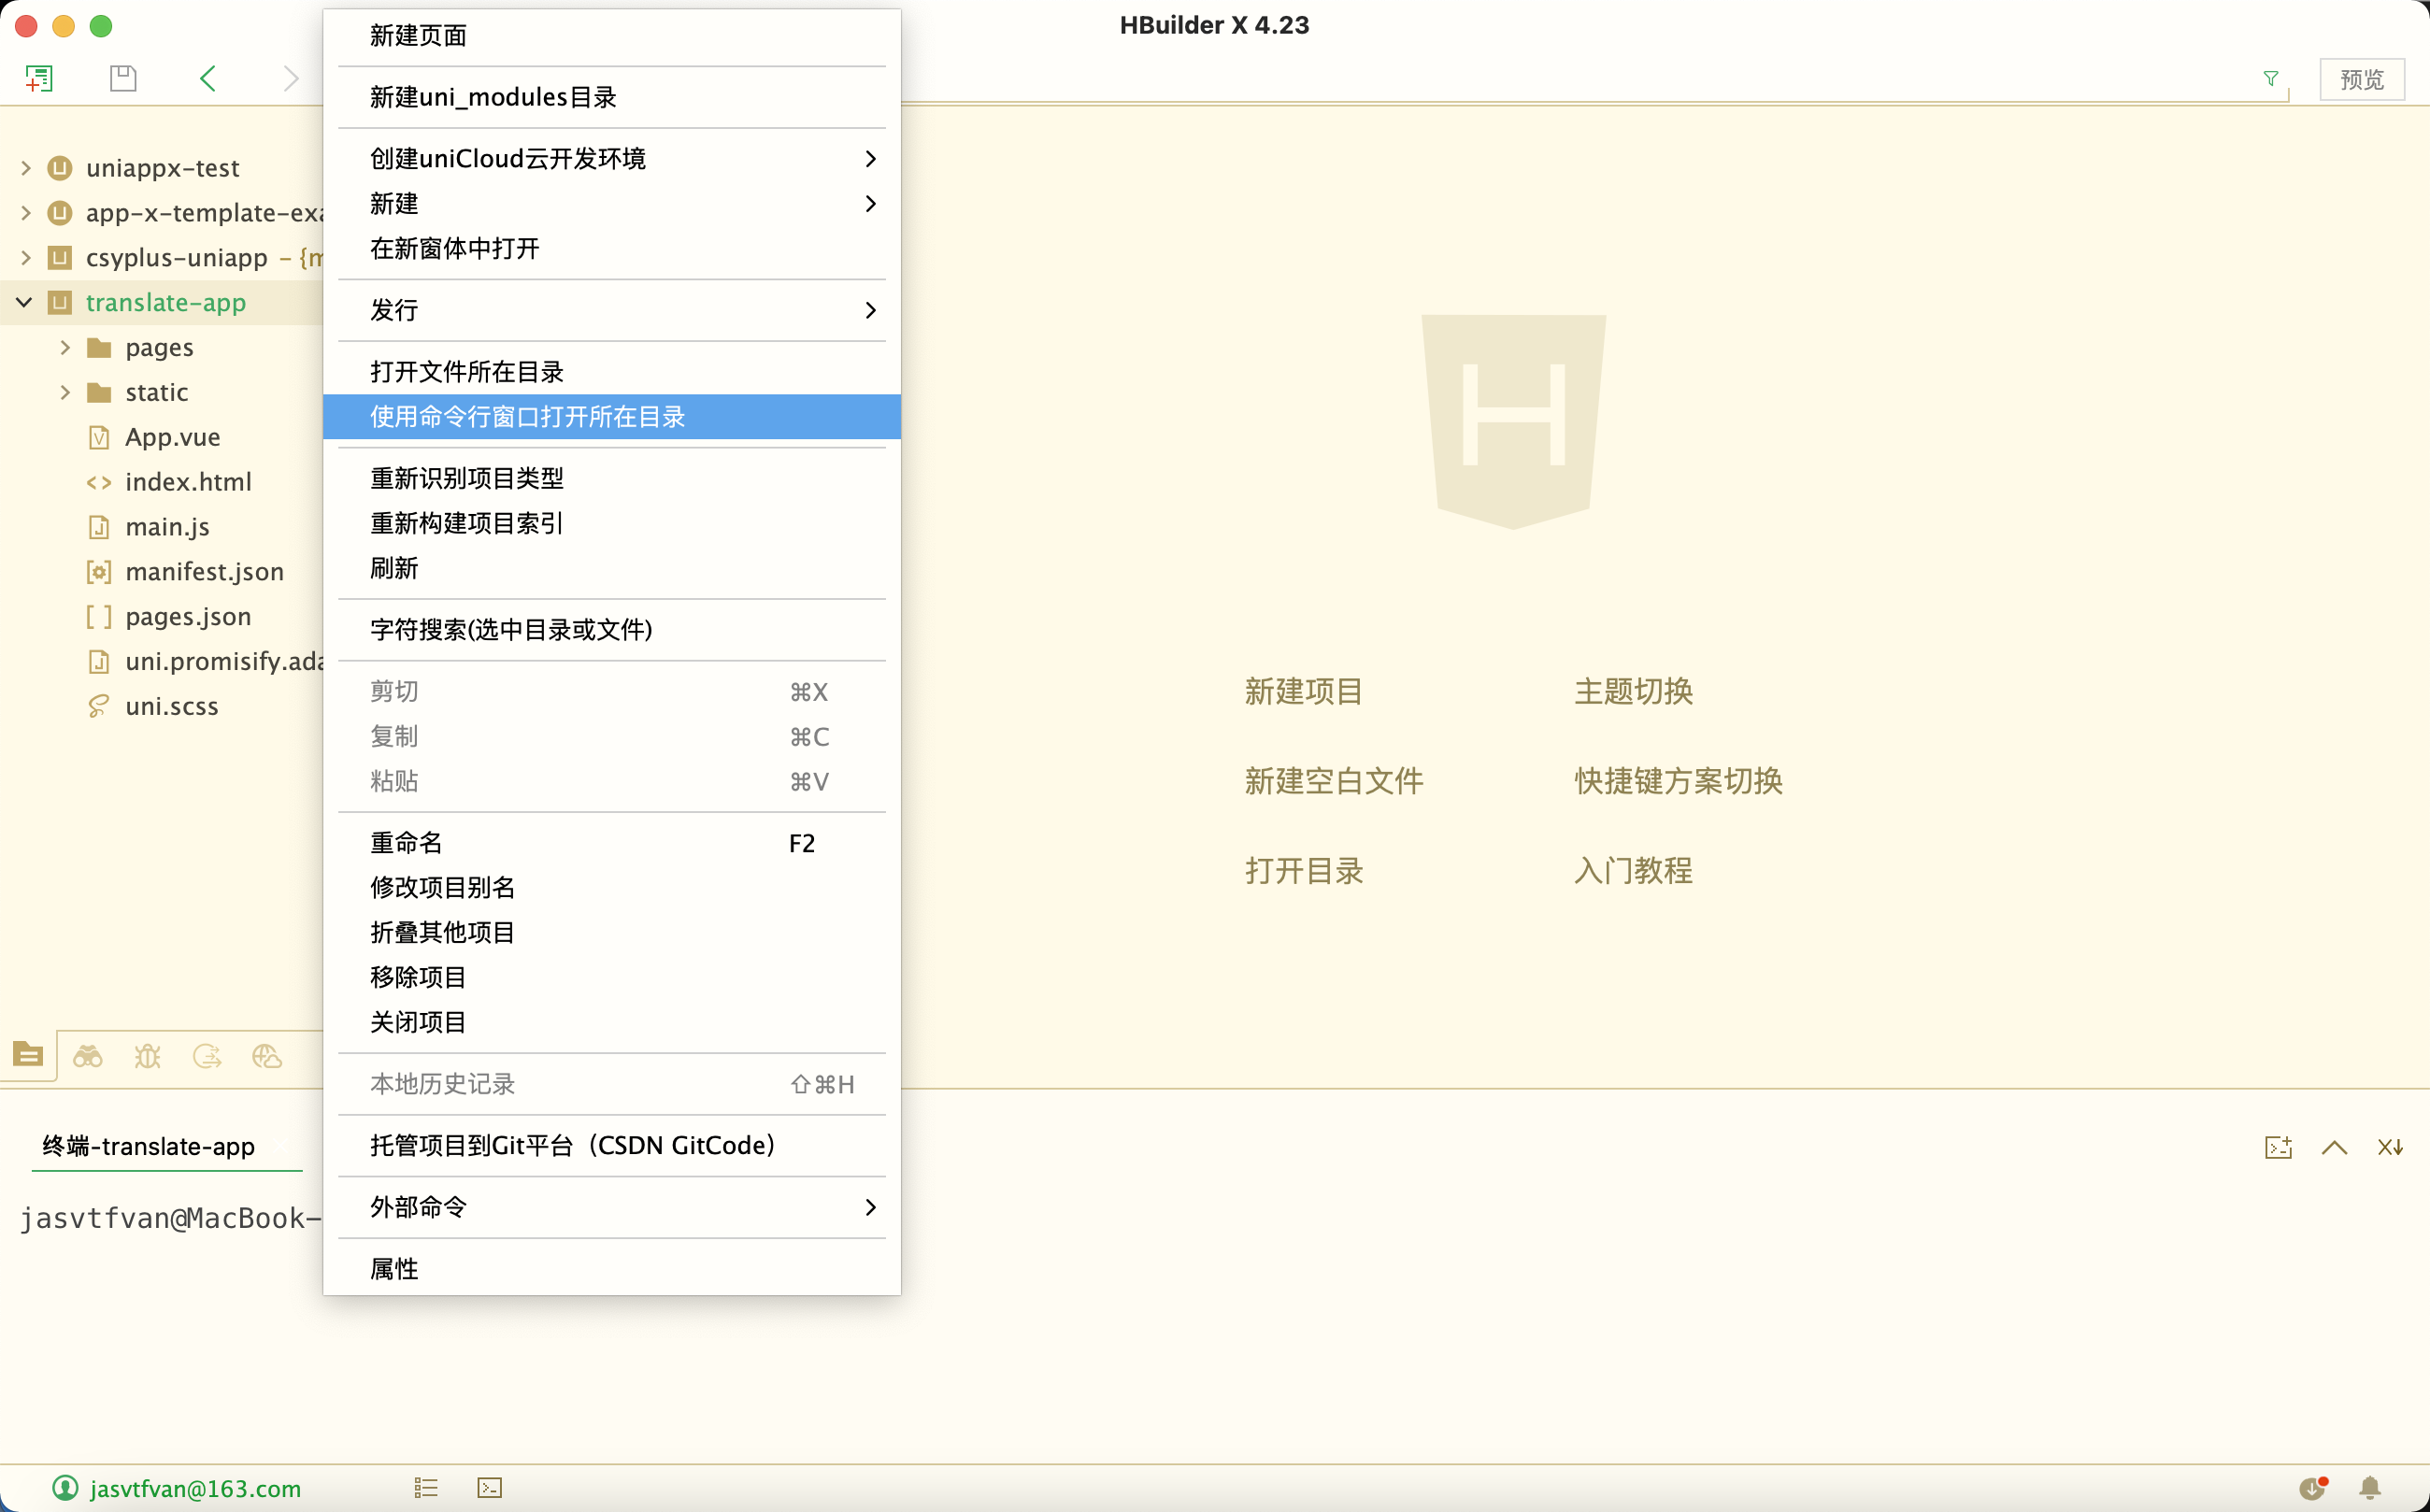
4.2 HBuilderX
- 配置文件参考官网:
https://nativesupport.dcloud.net.cn/NativePlugin/course/package.html
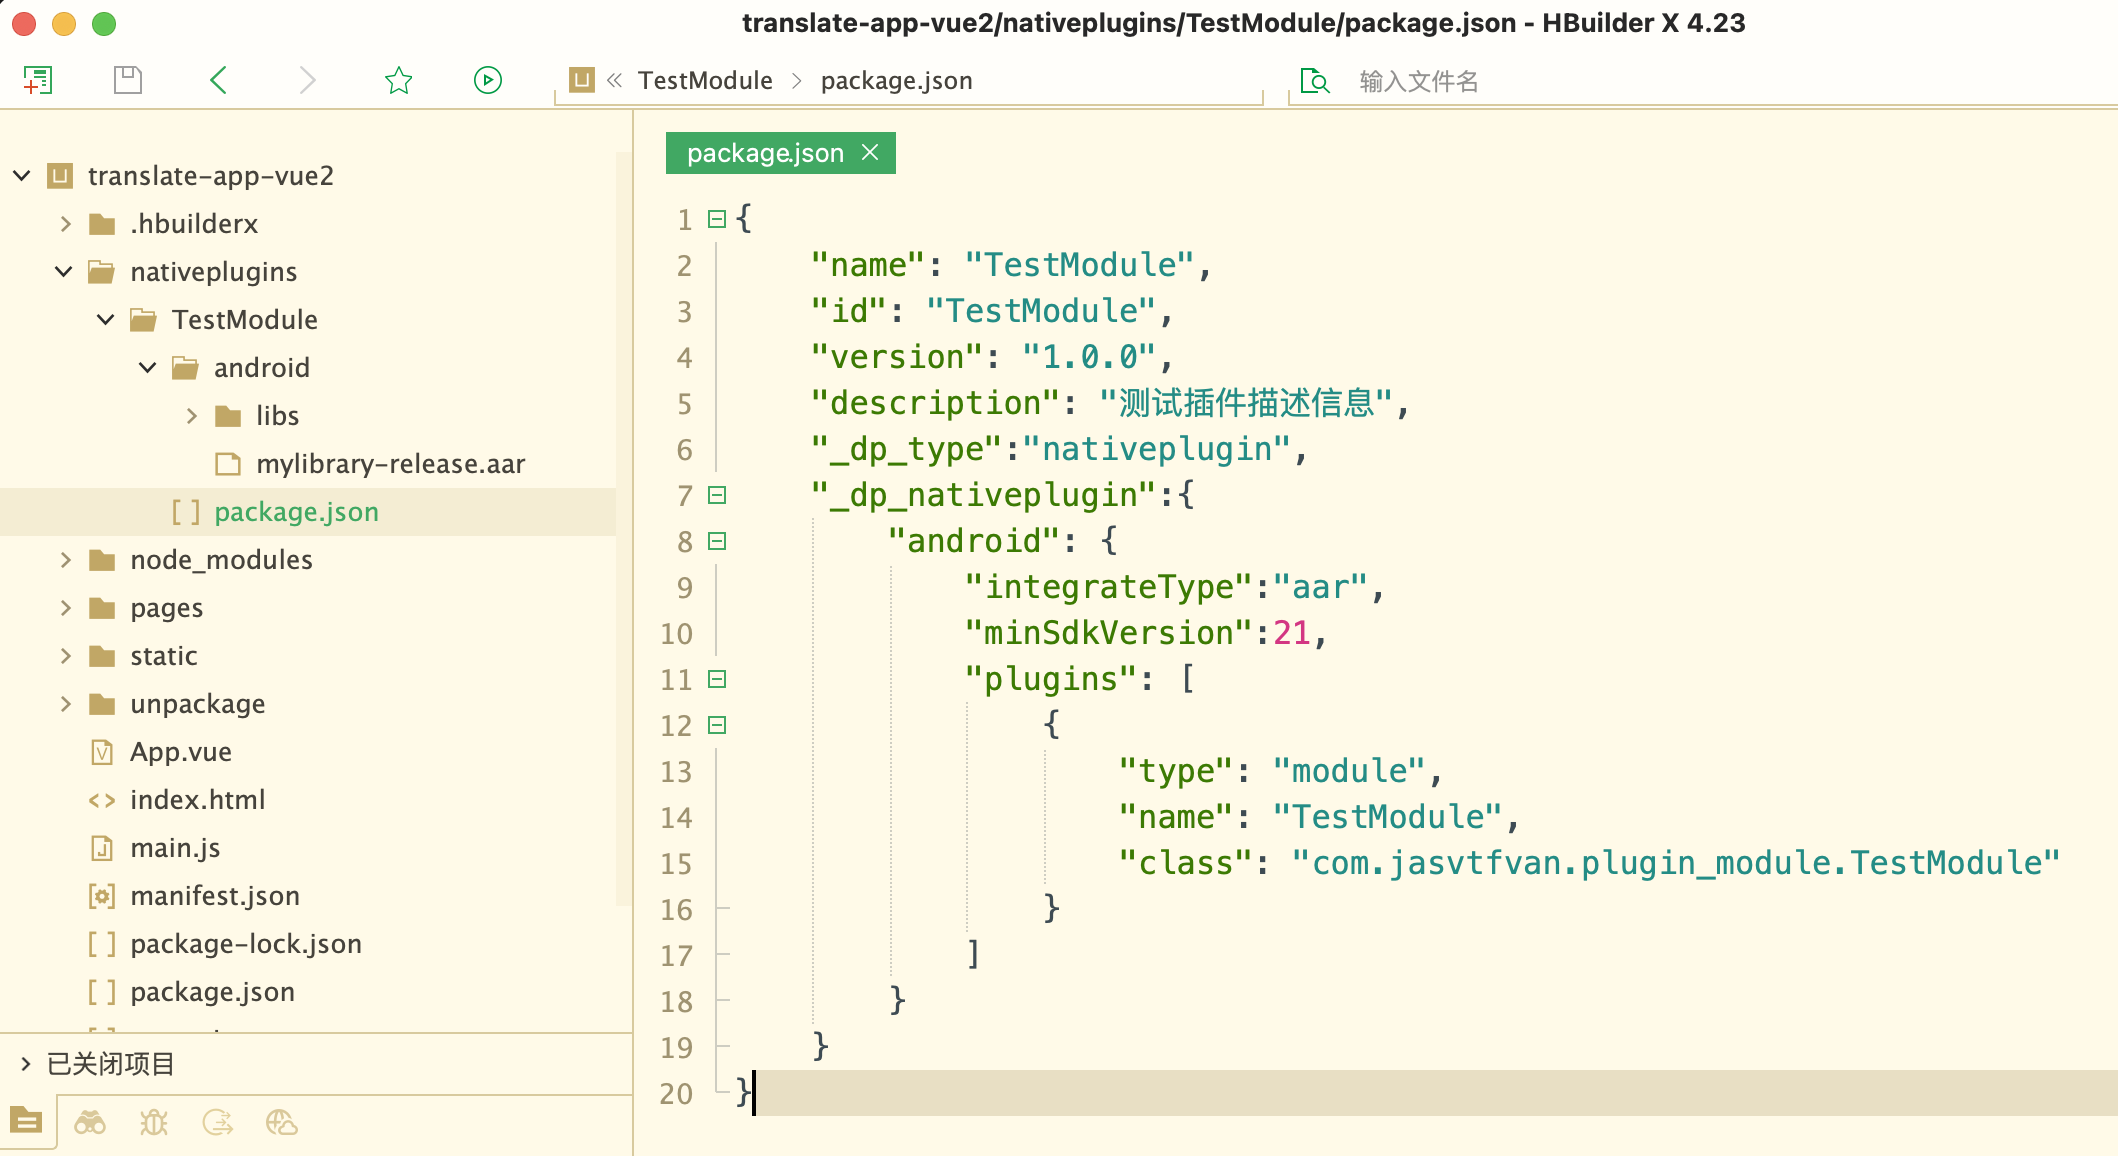
- 创建插件目录和文件
/translate-app-vue2/nativeplugins/TestModule/android/
/translate-app-vue2/nativeplugins/TestModule/package.json

package.json配置
{
	"name": "TestModule",
	"id": "TestModule",
	"version": "1.0.0",
	"description": "测试插件描述信息",
	"_dp_type":"nativeplugin",
	"_dp_nativeplugin":{
		"android": {
			"integrateType":"aar",
			"minSdkVersion":21,
			"plugins": [
				{
					"type": "module",
					"name": "TestModule",
					"class": "com.jasvtfvan.plugin_module.TestModule"
				}
			]
		}
	}
}- 粘贴
mylibrary-release.aar
结构说明
├─ TestModule                   ---> 插件id命名的文件夹
│  ├─ android                   ---> 安卓插件目录
│  │  ├─ libs                   ---> libs目录
│  │  │  ├─ some.jar            ---> 依赖的jar(当前不存在)
│  │  │  └─ lib-some.so         ---> 依赖的so文件(当前项目不存在)
│  │  ├─ mylibrary-release.aar  ---> 插件aar
│  │  └─ some.aar               ---> 基础依赖的aar(当前项目不存在)
│ └─ package.json ---> 配置文件- 选择本地插件
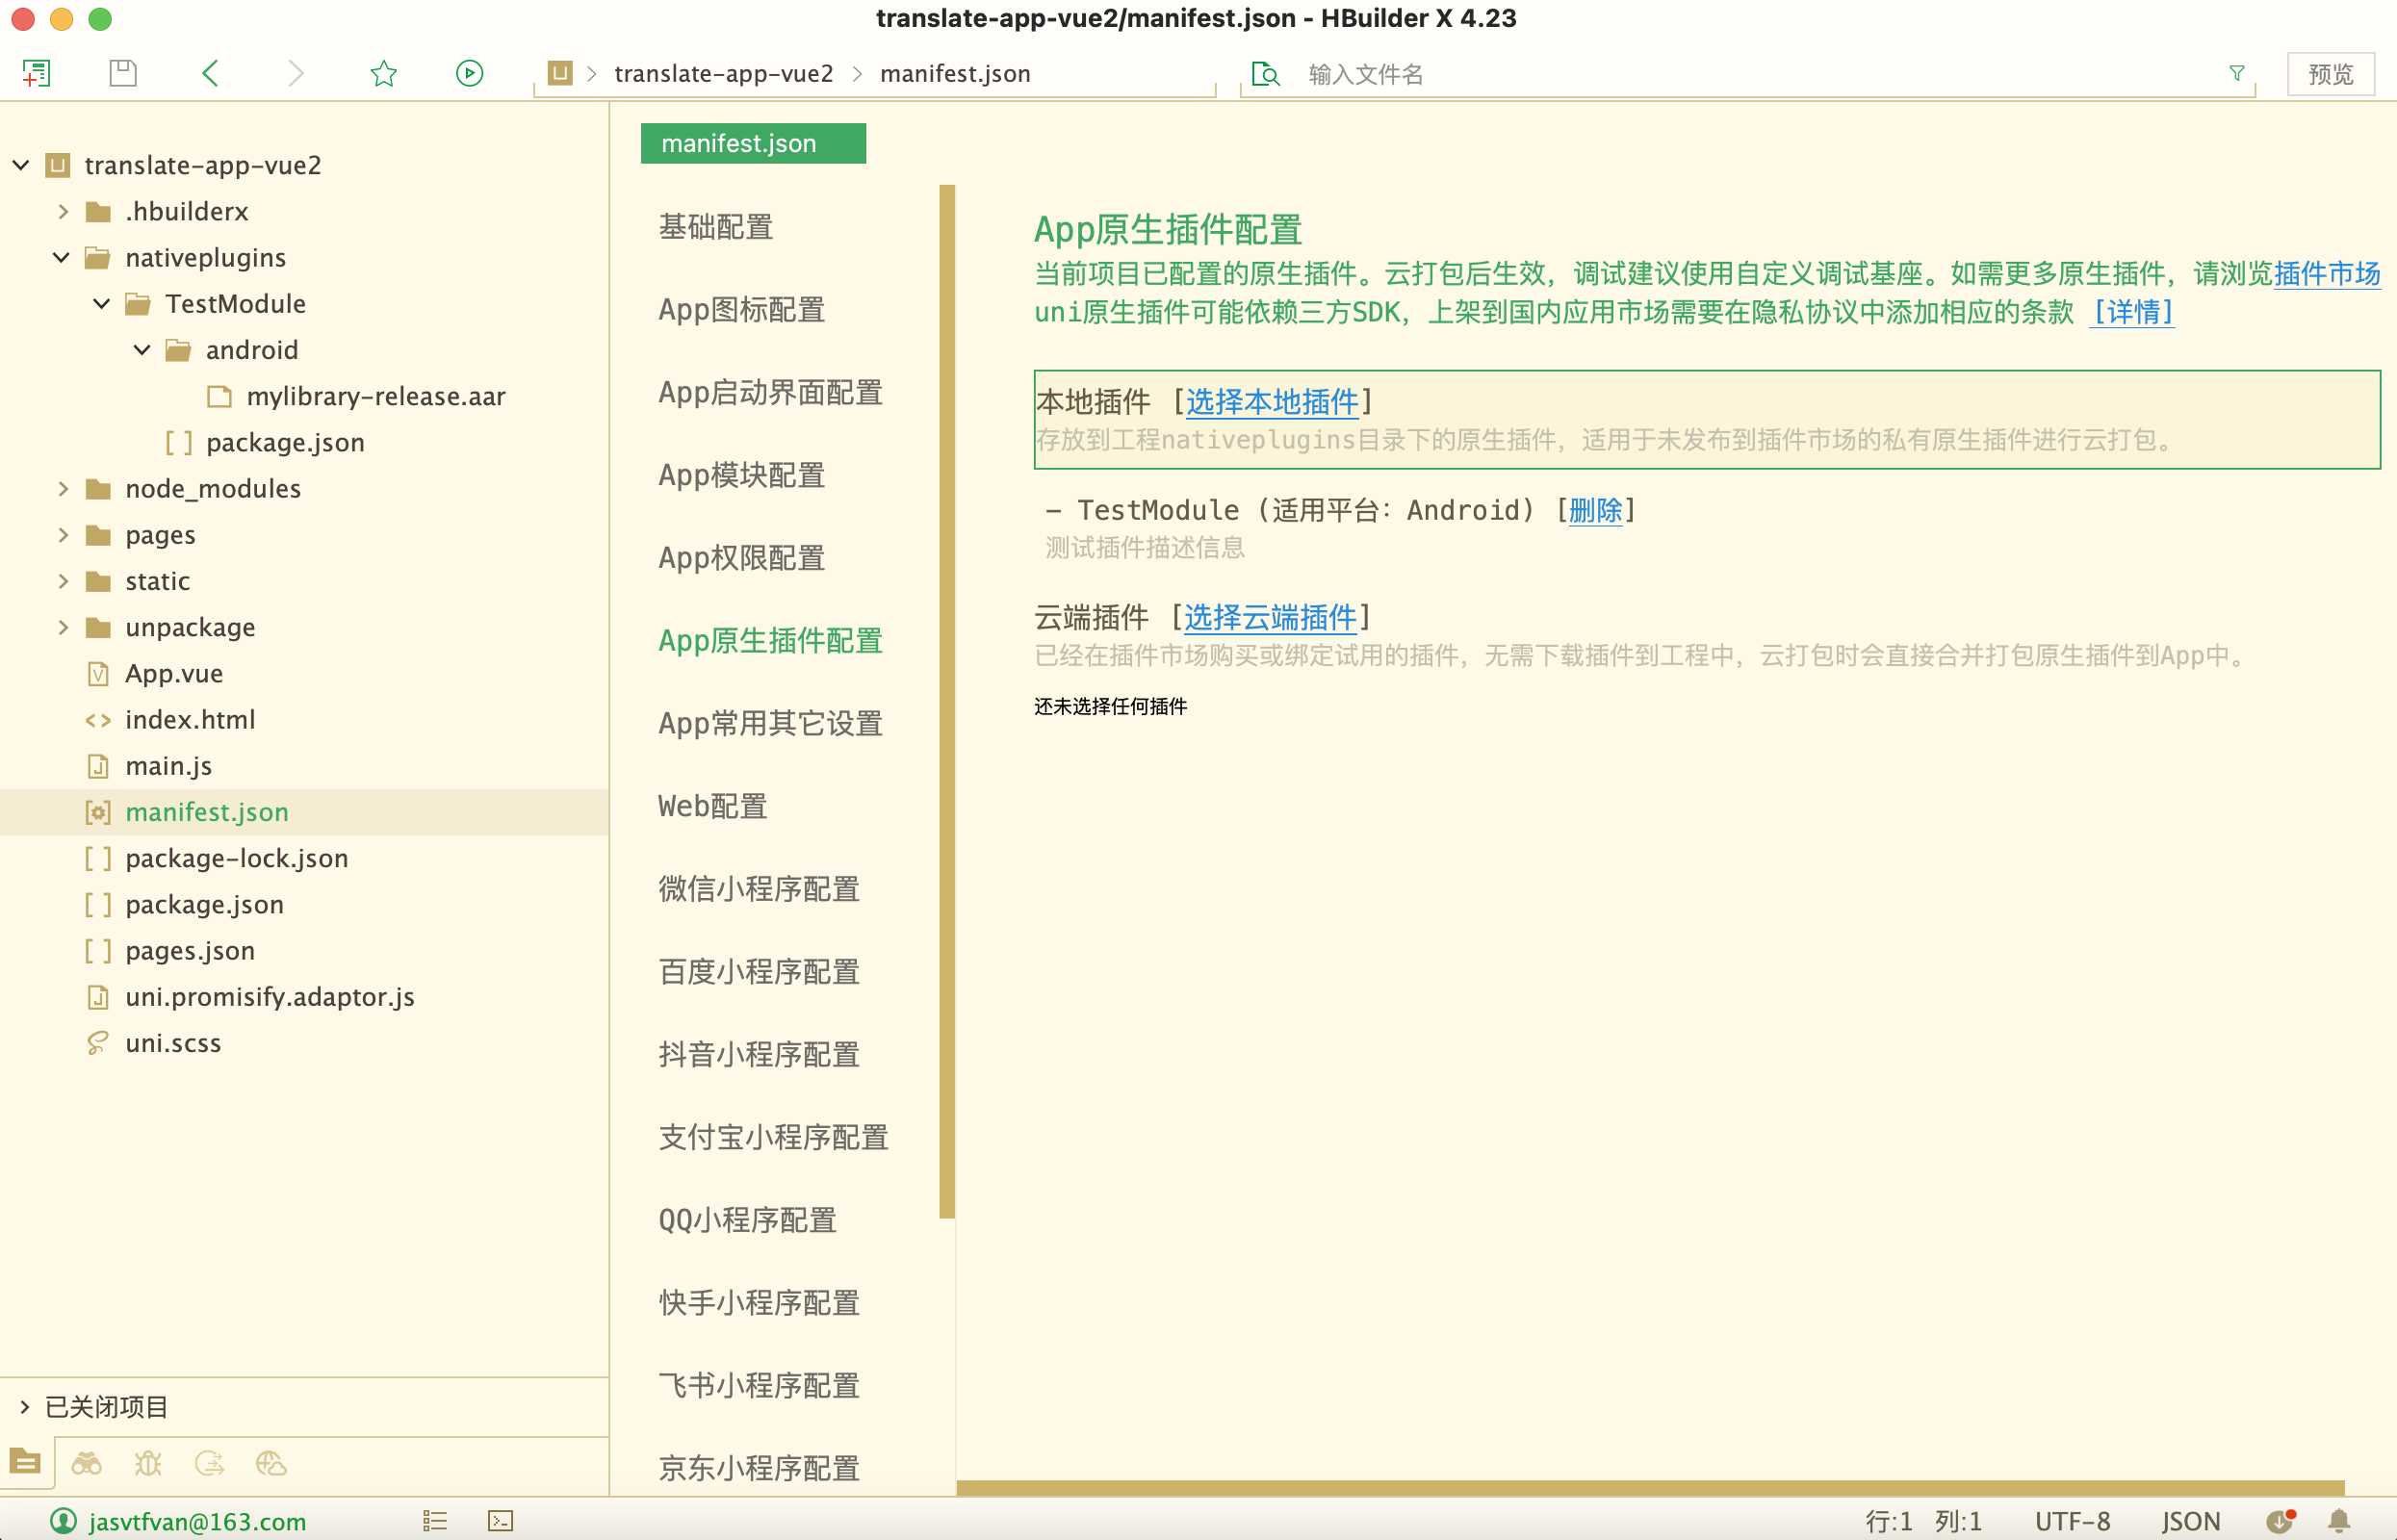
- 修改uniapp代码
注意
对于.vue文件,只能使用JSBridge进行桥接,因此跟Native Android只能通过字符串相互传参
对于.nvue文件,由于其底层通过weex实现了Native代码,因此可以通对象相互传参,但weex方案过旧不推荐使用
<template>
	<view class="content">
		<image class="logo" src="/static/logo.png"></image>
		<view class="text-area">
			<text class="title">{{title}}</text>
		</view>
		<view style="padding: 20px;">
			<button type="primary" @click="testAsyncFunc">testAsyncFunc</button>
			<br>
			<button type="primary" @click="testSyncFunc">testSyncFunc</button>
			<br>
			<u-button type="primary" text="默认"></u-button>
		</view>
	</view>
</template><script>
const testModule = uni.requireNativePlugin("TestModule");
export default {
data() {
return {
title: 'TitleInit',
}
},
onLoad() {
},
methods: {
testAsyncFunc() {
console.log(testModule);
const param = {
'name': 'unimp',
'age': 1,
};
const paramStr = JSON.stringify(param);
// 调用异步方法
testModule.testAsyncFunc(paramStr, (e) => {
console.log(e);
uni.showToast({
title: e,
icon:'none'
});
});
},
testSyncFunc() {
console.log(testModule);
// 调用同步方法
const ret = testModule.testSyncFunc("hello");
console.log(ret);
this.title = ret || 'testSyncFail';
},
}
}
</script><style lang="scss" scoped>
.content {
display: flex;
flex-direction: column;
align-items: center;
justify-content: center;
}
.logo {
height: 200rpx;
width: 200rpx;
margin-top: 200rpx;
margin-left: auto;
margin-right: auto;
margin-bottom: 50rpx;
}
.text-area {
display: flex;
justify-content: center;
}
.title {
font-size: 36rpx;
color: #8f8f94;
}
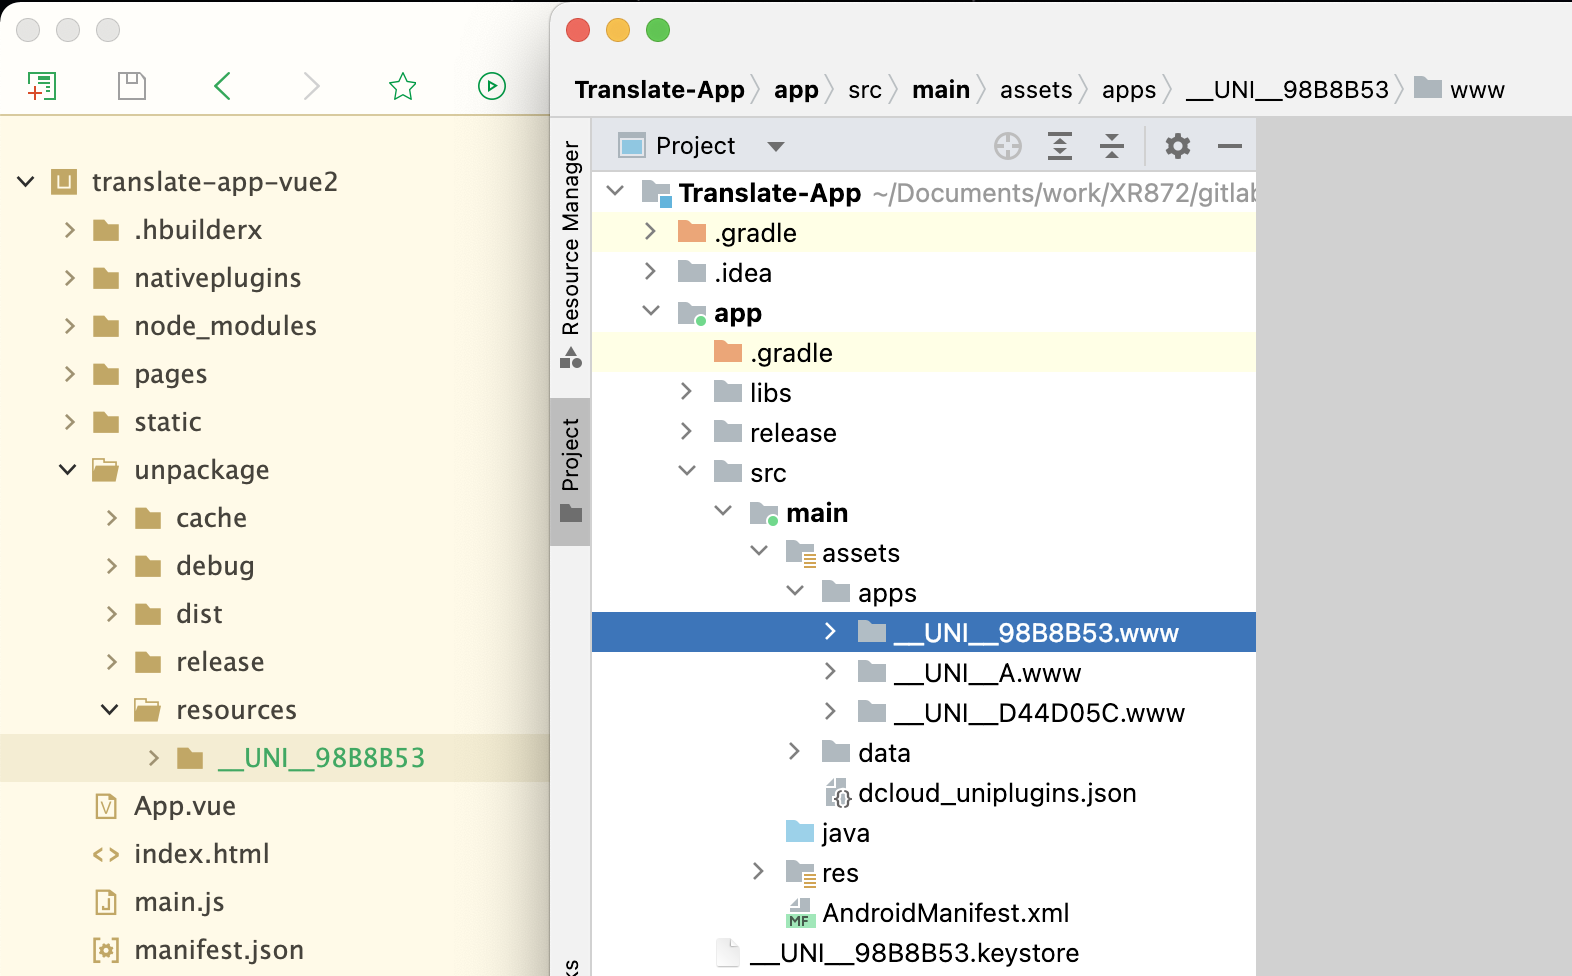
</style>- 拷贝资源文件
- 生成打包资源
- 从
HBuilderX拷贝静态资源到app主模块
5. Android Studio打包
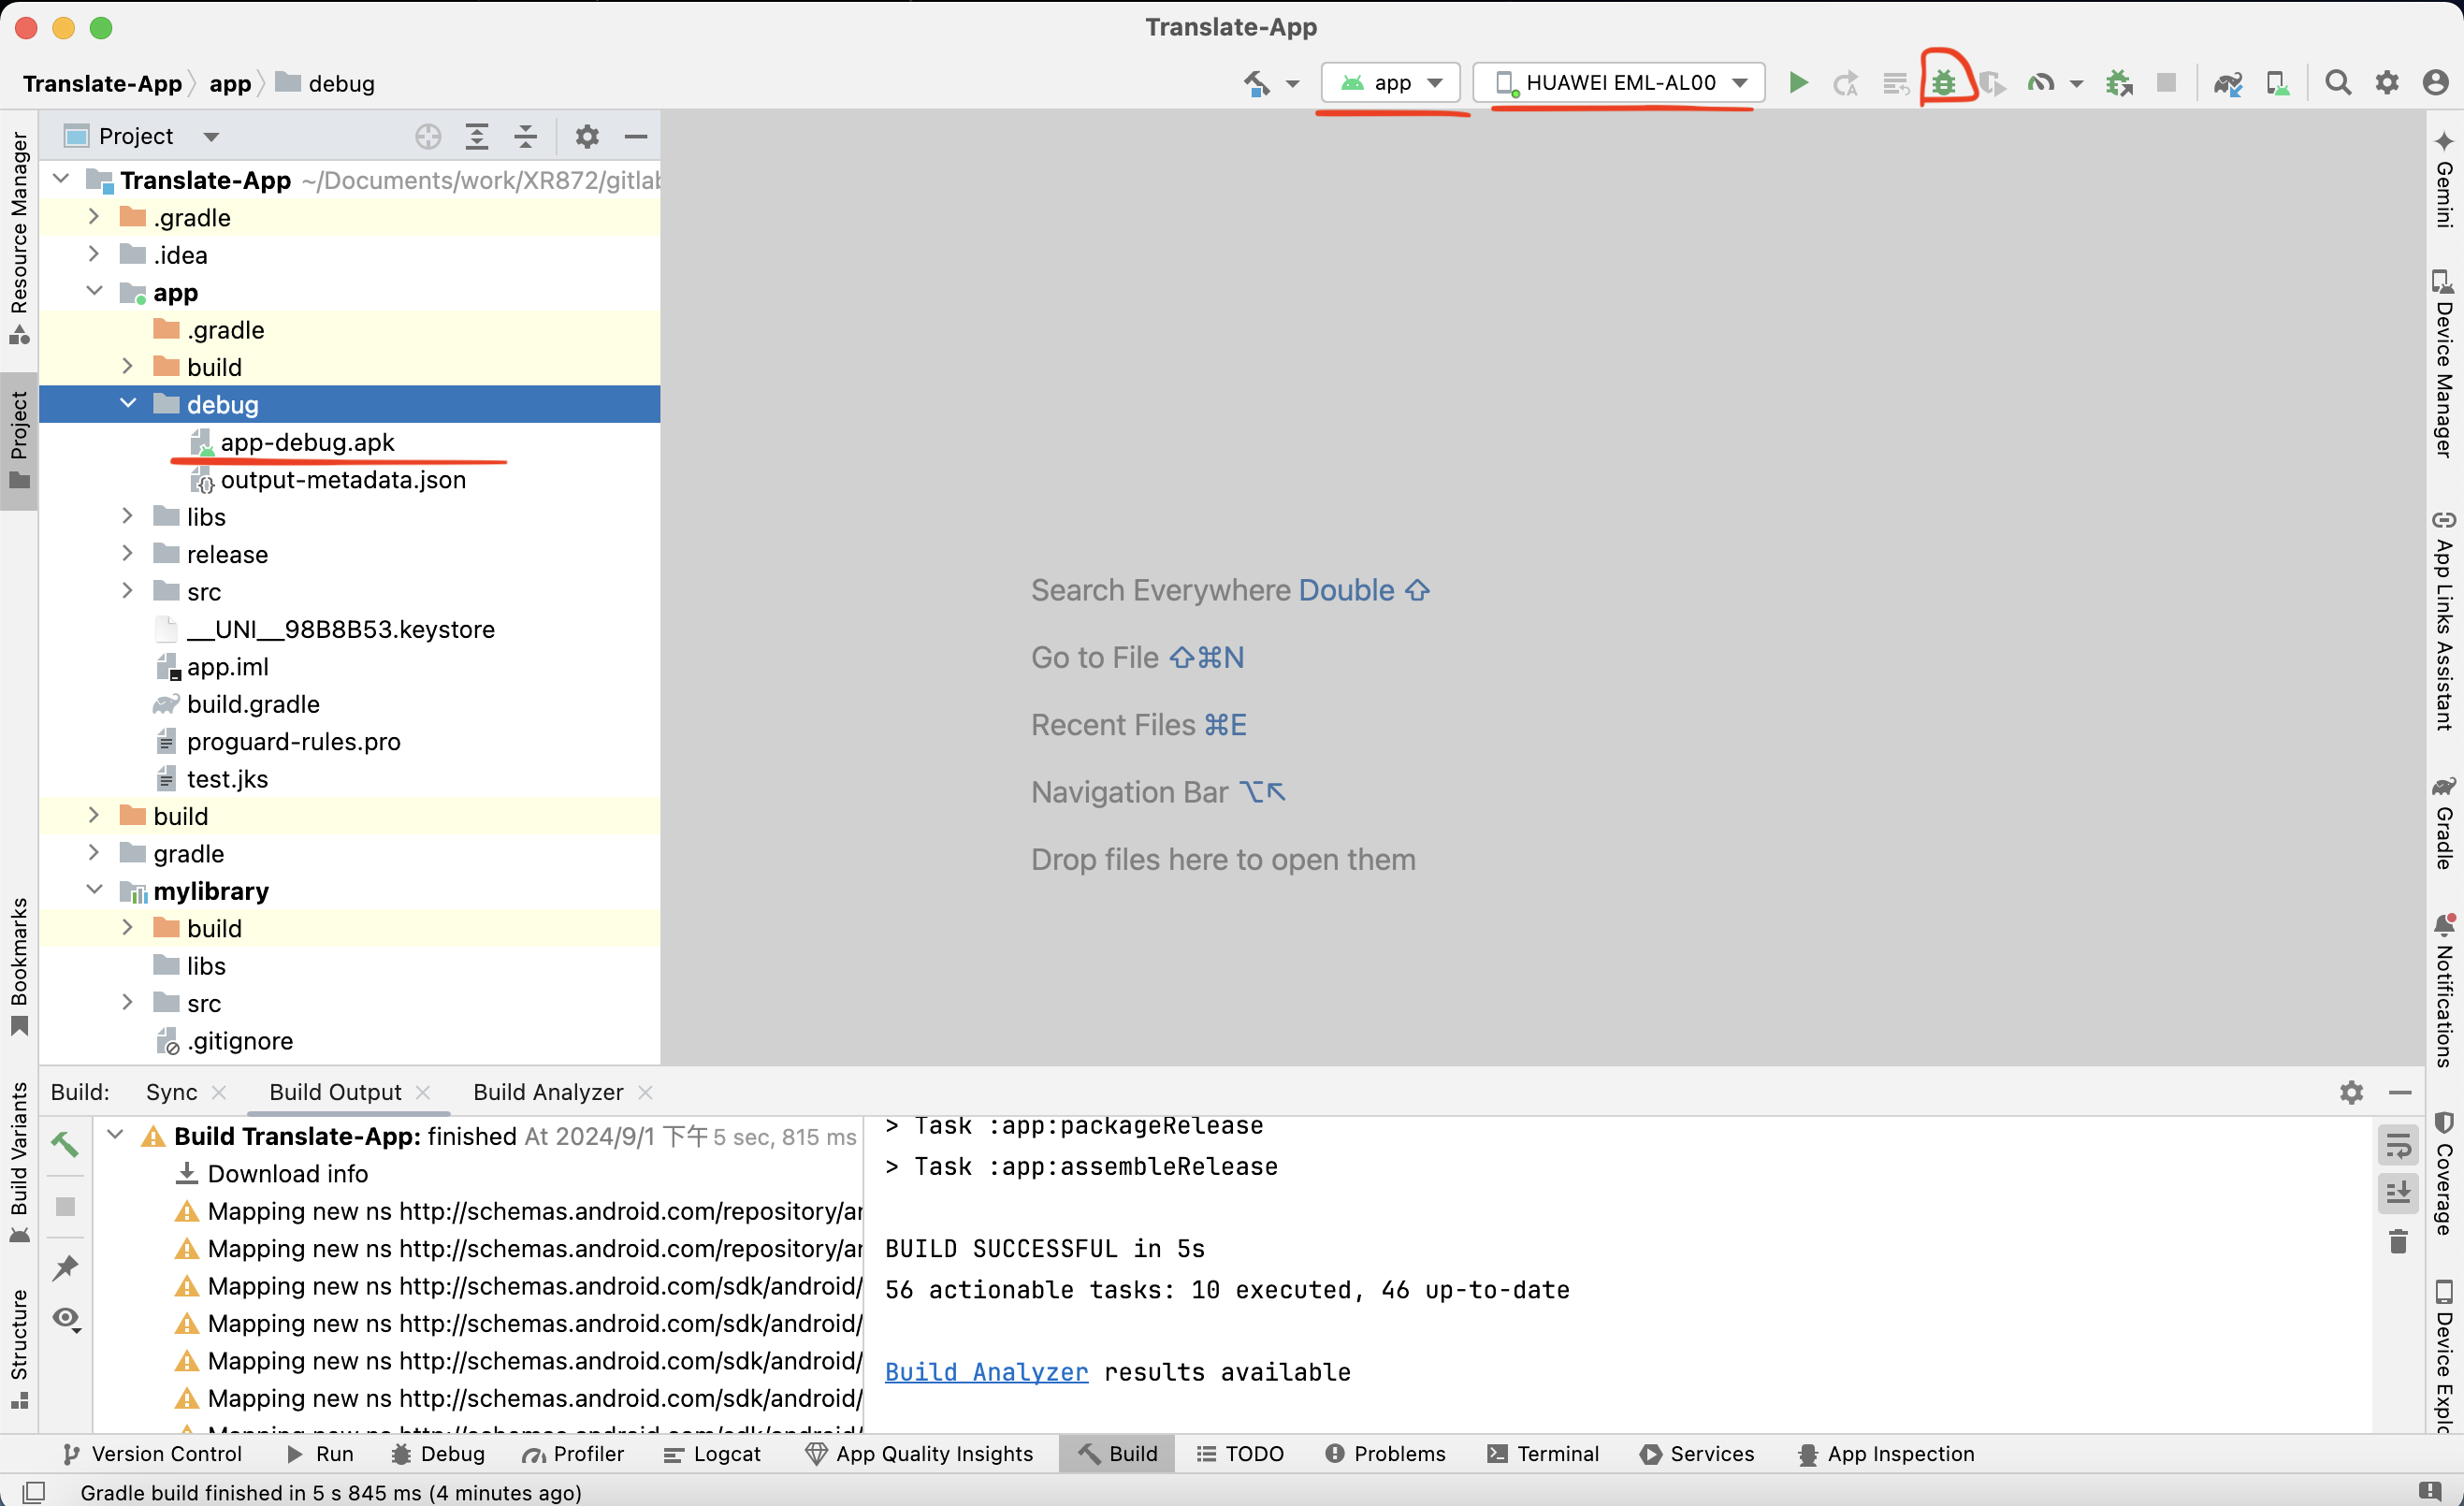
5.1. 打包apk(调试/发布)
提示
app-debug.apk 用于Android Studio调试
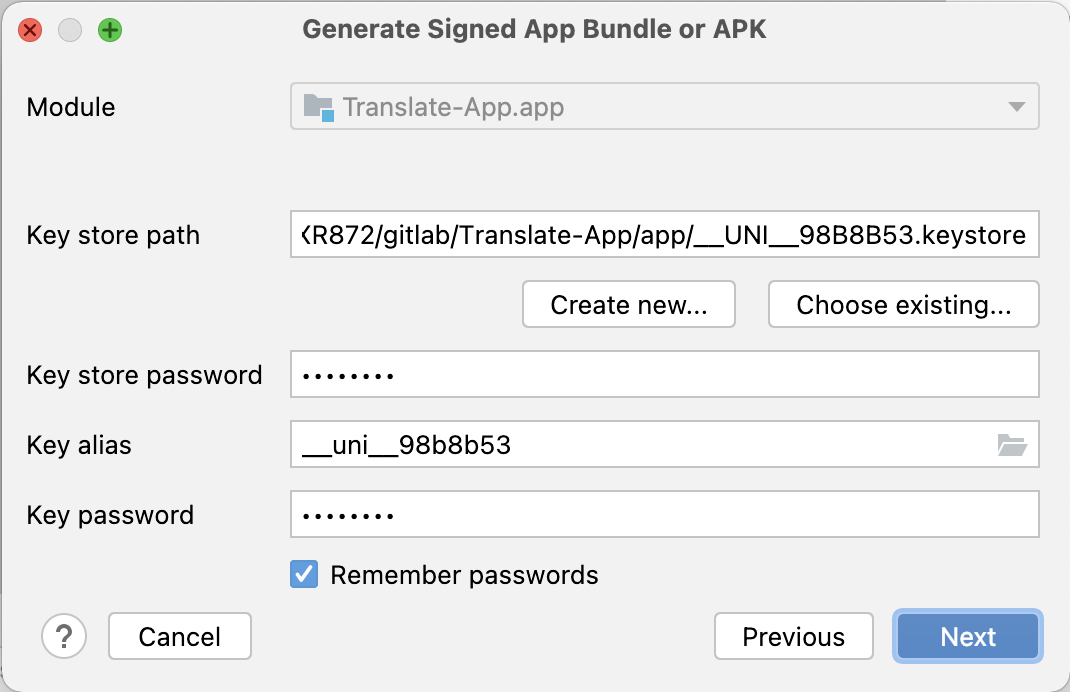
- studio打包
Build -> Generate Signed App Bundle / APK -> APK -> Next -> Release(或Debug)
- 打包后apk所在路径
/app/release/app-release.apk
/app/debug/app-debug.apk
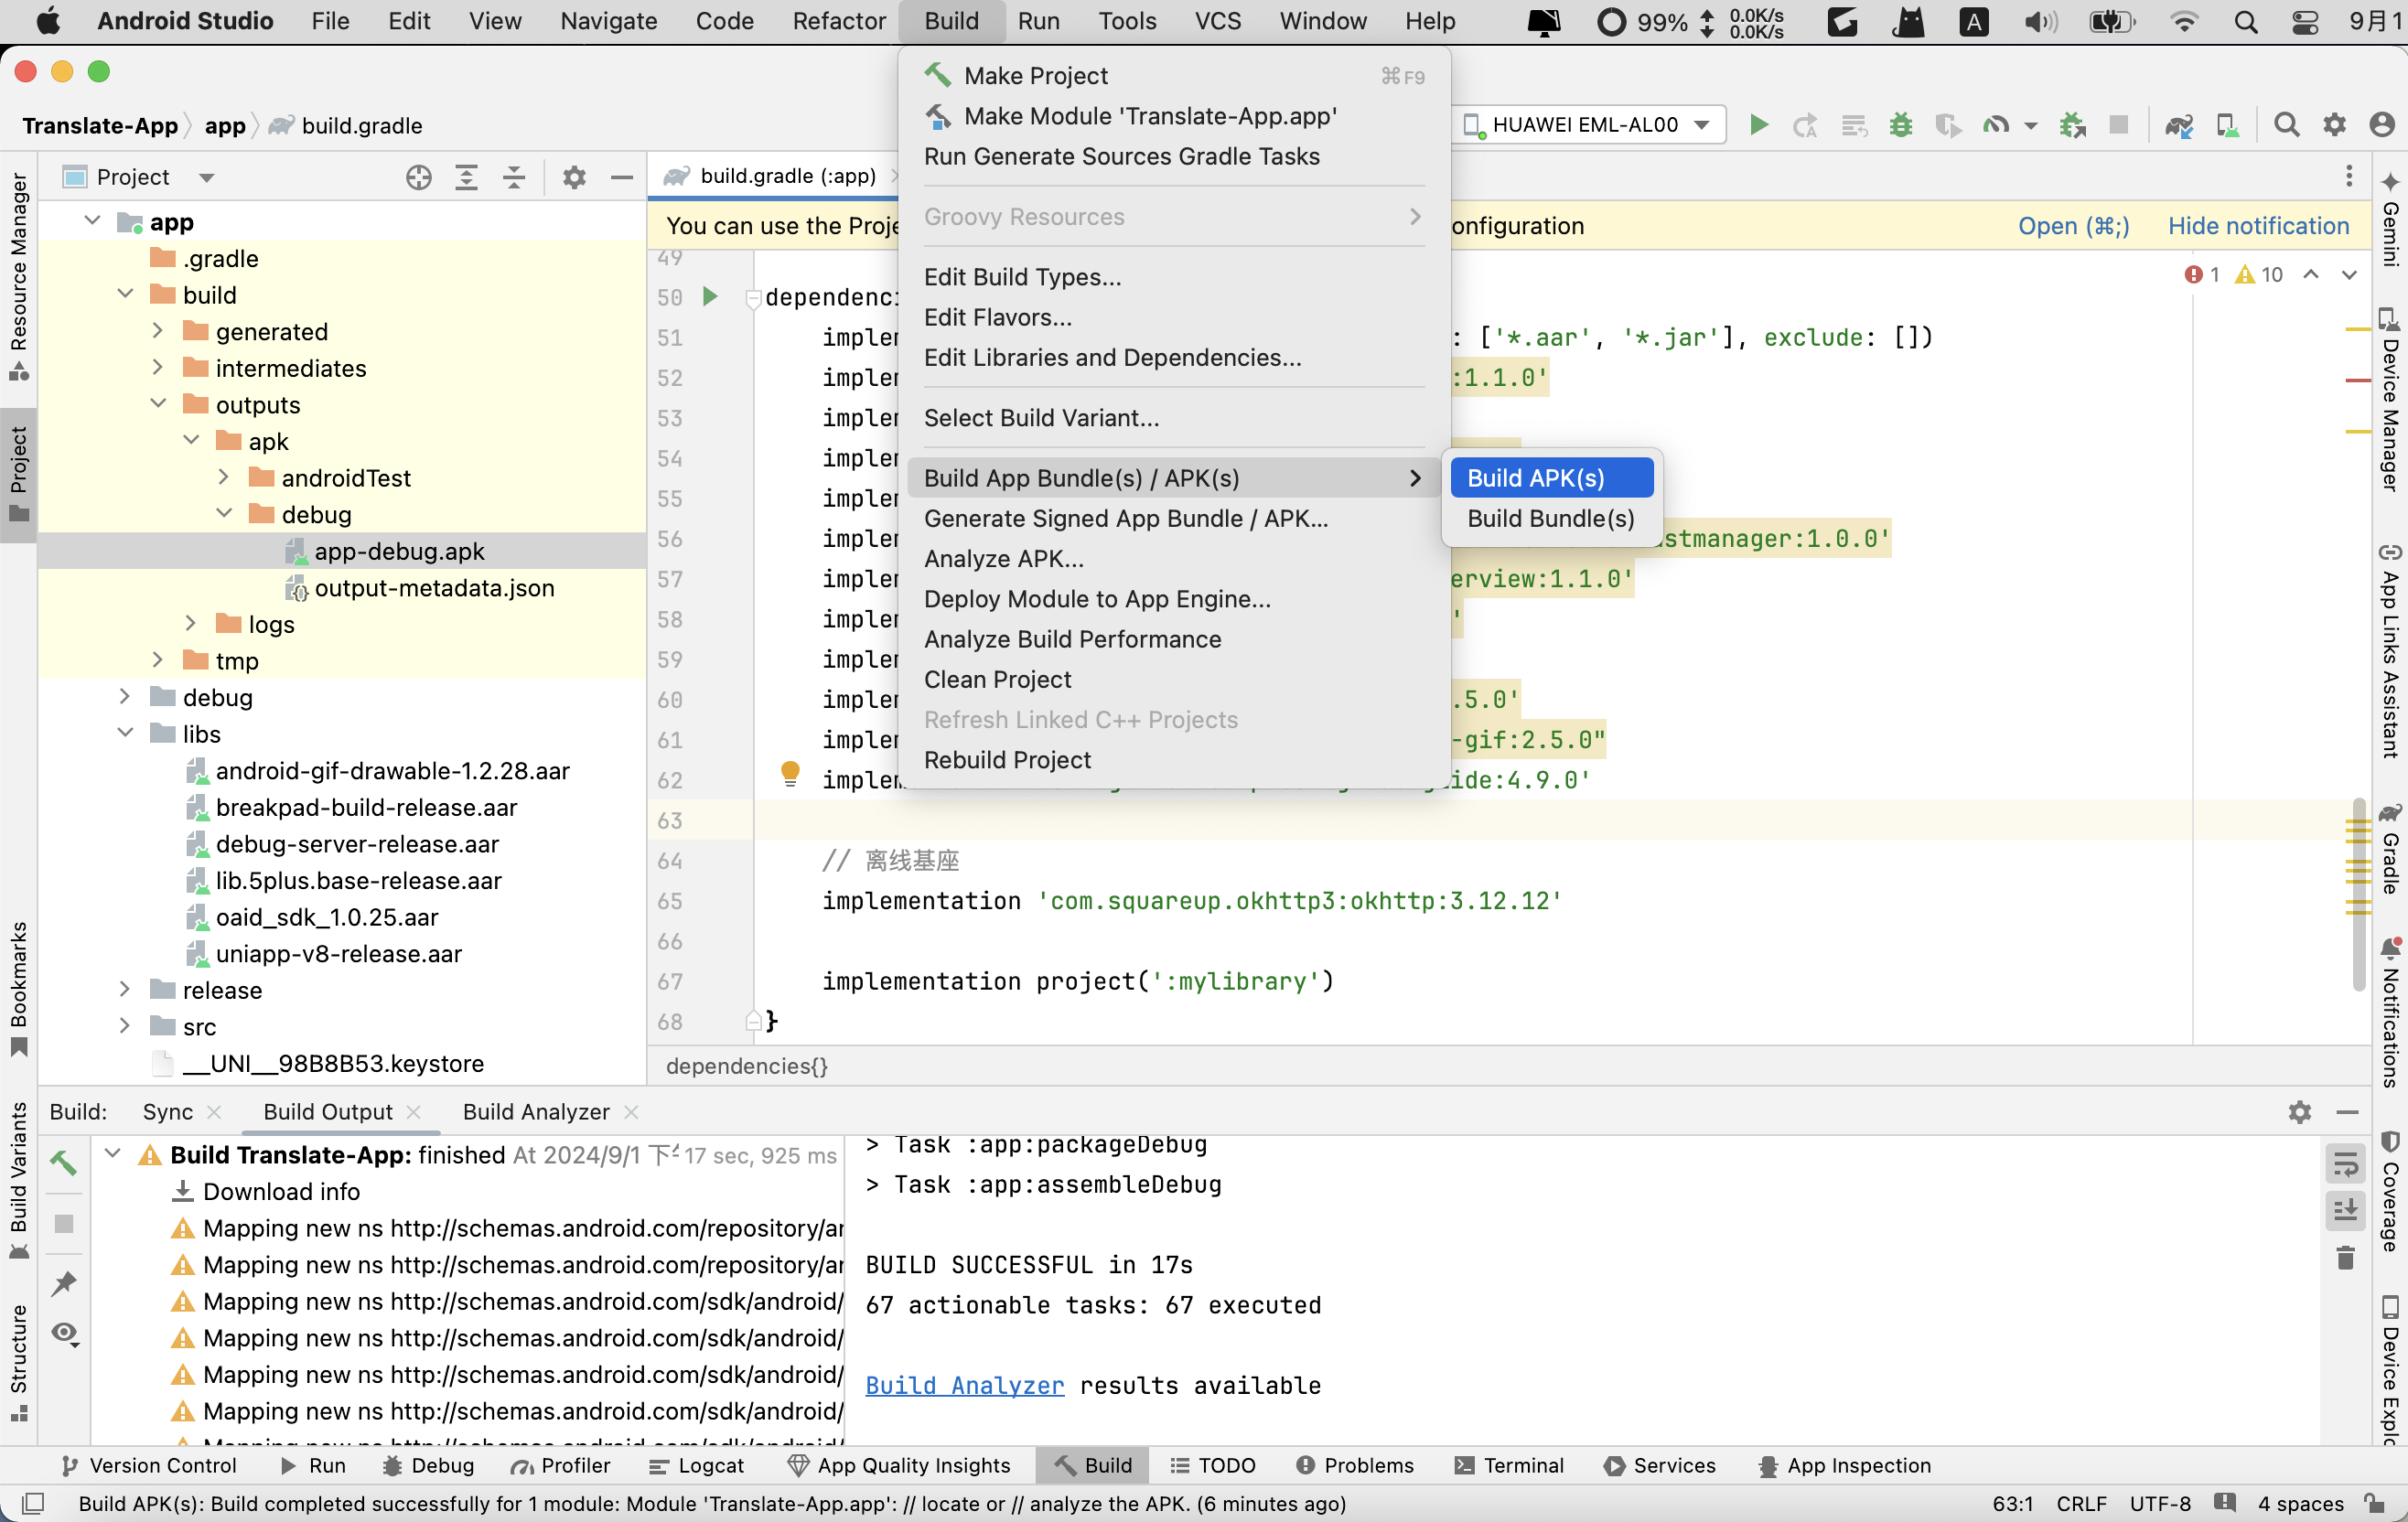
5.2. 离线自定义调试基座
- Android Studio
添加
debug-server-release.aar到libs中build.gradle中添加依赖
...
dependencies {
...
    // 离线基座
    implementation 'com.squareup.okhttp3:okhttp:3.12.12'

    implementation project(':mylibrary')
}Build -> Build App Bundle(s)/APK(s) -> Build APK(s)
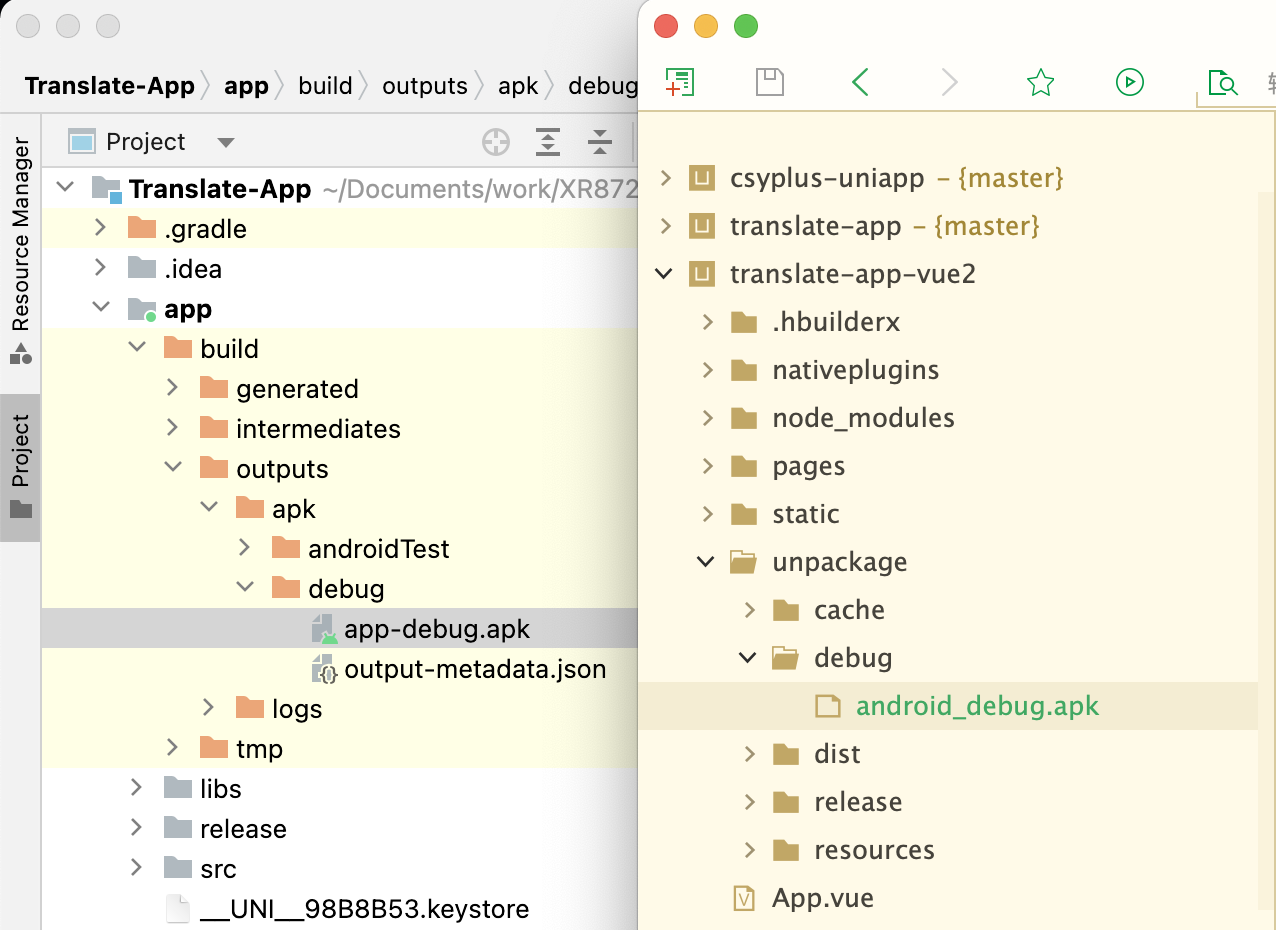
复制debug.apk
/Translate-App/app/build/outputs/apk/debug/app-debug.apk
- HBuiderX
粘贴到HBuilderX并重命名为android_debug.apk
/translate-app-vue2/unpackage/debug/android_debug.apk
6. 开发调试
6.1. 配置android设备
android掌上学习机(android5.1.1)
Settings->System->Developer options->开启顶部总开关(On)->Debugging->开启USB debugging
华为手机
手机设置->关于手机->版本号(连点2-7下开启开发者模式)
手机设置->系统和更新->开发人员选项->
设置开关
- 开启:开发人员选项
- 开启:USB调试
- 开启:连接USB时总是弹出提示
- 关闭:监控ADB安装应用
- 开启:“仅充电”模式下运行ADB调试
6.3. HBuilderX 真机调试
- 有助于调试业务代码
MAC打开
关于本机->系统报告->硬件/USB->USB 3.1 总线找到华为设备,复制厂商ID打开MAC终端,输入命令
echo 0x12d1 >> ~/.android/adb_usb.ini重启adb(HBuilderX)
HBuilderX运行
选中项目 -> 运行 -> 运行到手机或模拟器 -> 运行到Android App基座 ->
- 无原生插件:
使用标准基座运行 - 有原生插件:
使用自定义调试基座运行

6.4. Android Studio 真机调试
- 有助于调试原生代码
打包完毕(见5.1打包apk)
/app/debug/app-debug.apkdebug调试